Bacon is the new black
May 27, 2011 § Leave a comment

Bacon cheddar scones. Yes, they're in the shape of a tie fighter. That only makes them more delicious. Also, how do I not have any actual pictures of bacon? Clearly, I need to whip up a big ol' pile of bacon post-haste and fix that.
A co-worker sent me a link this morning to a wonderfully well-thought-out, well-written, well-supported post about the non-evilness of bacon. When I read the introductory paragraphs, I felt like they were something I could have written…my reputation as a baconeater (not to be confused with a Baconator) often precedes me, and since I’m relatively slender these days, I get a lot of astonished reactions when I talk about all of the delicious things I do with said bacon. You know, like put it in cookies, or replace the veggies in chicken pot pie with it, or throw some in a burrito, or — my favorite, which is really not one I make, but I do love to eat it — wrapping it around a cheddar-stuffed hotdog from the local butcher and then deep-frying the whole concoction. Excuse me while I slaver.
I now pass it on to you, because it is interesting and informative, and will make you feel much less guilty about loving and consuming bacon regularly. At least, that’s what it did for me. It’s long, but it’s totally worth reading. Bacon: Health Food or Devil in Delicious Disguise? (From the Balanced Bites blog)
Yikes!
May 25, 2011 § Leave a comment
I actually have a ton of stuff to blog about (mostly foodie stuff like key lime cupcakes and s’mores pie, but don’t think I’ve forgotten about all my other projects, like that hat I keep promising that just needs a quick test knit before I publish) but life has gotten in the way. So very quickly today I’m just going to say that I’ve re-discovered Project Spectrum: a create-along that I’ve always meant to participate in and have always been unsuccessful at actually doing. This year will, hopefully, be different. Of course, that means I’ve only got 5 days to do something awesome with red and/or orange…
Foodgasm
May 19, 2011 § Leave a comment
The past weekend’s kitchen marathon (more on that later, as there is cupcakey goodness that requires sharing, plus some other nifty stuff) pretty much ran me dry of some staples like powdered sugar, eggs, powdered buttermilk, cream cheese, cupcake wrappers…you get the picture: I needed a trip to the market. While I was at said market, it occurred to me that I had snap beans and fingerling potatoes from the farm market that I needed to use up, but nothing for an entree.
I ran through a list of my default entrees, and then a list of entrees I’d been considering but hadn’t tried yet and nothing seemed quite right. So I decided I’d just peruse the meat section of the store and see if anything struck me. I considered steak, and stew beef, and chicken, and pork chops…and then I saw the lamb. I love lamb. I almost never get to have it because I’m what my mother calls “frugal” and everyone else calls “cheap” so I’m only really willing to pay the premiums restaurants charge — on the rare occasions when they have it — if it’s something special like my birthday. And somehow, I had never cooked lamb myself. But…it was the perfect amount: about 1.5lbs, cut from the leg. And it was only $4.99/lb. Into my basket it went.

Ragout of Lamb. Also on the plate, fresh snap beans and fingerling potatoes and freshly baked bread.
Of course, I realized as soon as I got home that I had absolutely no idea how to prepare lamb. I grabbed a bunch of cookbooks and settled in. I immediately discarded everything that called for an overnight marinade…I wanted my lamb tonight! I considered kebabs for awhile, but I didn’t really have anything on hand to kebab them with. I finally settled on a recipe for Ragout of Lamb from the 1961 New York Times Cookbook. The ingredient list was simple, as was the procedure for cooking. Exactly what I wanted.
If you’re not sure what a ragout is, go read about it here — I’ll wait. (I had to look it up myself, just for the record.) I did have to tweak the ingredients a bit — for instance, I didn’t have Spanish Sherry on hand, so I just threw in some of the Zinfandel I was planning on drinking with the meal. I also substituted paprika for the black pepper called for in the original: I don’t care for pepper, and I like paprika. I do this a lot…I just can’t be bothered to get a bunch of specialty ingredients, and the stuff I have on hand tends to be stuff I like. If it’s close to what’s called for, it almost always tweaks the recipe in a direction I like.
Below is the recipe for the ragout. I prepared the snap beans like this; boiled the potatoes for about 20 minutes, sliced them up and added them to the beans; and the bread recipe is the same one I’ve mentioned previously.
Recipe
(adapted from 1961 New York Times Cookbook)
- 1 1/2 lbs lamb (I used a filet from a leg), in 1″ cubes
- 1/4 c. flour
- 1/2 tsp salt
- 1/2 Tbsp paprika
- 1/4 c. olive oil
- About 1 1/2 c. chicken broth (beef broth should also work)
- 1/3 c. sweet red wine (I used Zinfandel because that’s what I was drinking)
- 2 cloves garlic, crushed
- 1/2 c. grated Parmesan cheese
- Basil to taste
Preheat oven to 350°. Heat oil in a saute pan. Combine the flour, salt, and paprika in a dish suitable for dredging, then dredge cubed lamb. (Protip: I put it all in one of those white plastic takeout containers then just put the lid on and shook it all up instead of trying to dip each of the cubes in the flour dredge. Use a fork to flip the cubes out of the dredge and into the oil.) Cook lamb in preheated oil until brown on all sides. Add broth, wine, and garlic. Simmer for 2 minutes (give or take — you just want everything to heat through). If your saute pan is oven safe and has a lid, put the lid on and pop it in the oven for about an hour. If not, transfer it to an oven-safe casserole, cover, and pop it into the oven for about an hour.
Remove from oven and uncover. Immediately stir in cheese. If sauce is too thick, stir in a little more broth; if too thin, stir in a little more flour. Spoon onto plate. Garnish with basil.
Apologies for the poor picture quality: the battery in my DSLR was dead and I was hungry, so I just snapped a quick shot with my Droid.
That third thing
May 16, 2011 § Leave a comment

Look! It's me in a skirt!
Remember the other day I said I’d gotten three projects completed, but I’ve only shown you two of them so far? Well, now you can hie yourself on over to the Lion Brand blog and read all about the third project: my finally-complete Carnaby skirt, and all of the little changes I made to customize it just for me. Love this pattern, BTW — all the changes I made were because I wanted to tweak little things for me, not because the pattern needed it. In fact, I find it much easier to customize a well-written pattern than one that needs tweaking just to be workable. This one was a breeze.
When a dilemma really isn’t
May 12, 2011 § Leave a comment
A couple of my friends are busy having babies and I had thought I would make them quick little baby blankets. Then an awesome pattern came across my Twitter feed, and I was smitten by the Lolly Pod. The pattern is available for sale either at the designer’s website or via Ravelry, and I realized I had a dilemma.
See, being a bit of a designer myself, I realized that I could very easily reverse-engineer this pattern. Not that I would do so to sell as my own, but there was really no need for me to shell out six bucks for the pattern. But. I want to see independent designers flourish (again, being a bit of one myself). This is a design that thought clearly went into, is fairly unique, and is not overpriced, especially since you get the patterns for both the cap and the sack. So really, not much of a dilemma at all when I thought it through.
And now that I’ve purchased the pattern, I’m very pleased to see that it appears to be thoughtfully laid out, reasonably well written (that’s always hard for me to really judge fairly until I actually work through it), and a lot of fun to make. I can’t wait to cast on! Now I just have to choose a yarn…I’m thinking I might go with Lion Brand Superwash Merino Cashmere…because machine washable and cashmere sounds just perfect for baby stuff. (Full disclosure: I work for LB, so I tend to use their stuff a lot. But still…washable cashmere…how does that not have “baby” written all over it?)
Cake FAIL = Dessert WIN
May 9, 2011 § Leave a comment
Remember those two castle cakes that didn’t make the final cut? Well, I just can’t bear to throw away food, especially when that food is delicious cake. So I put all the broken cake into food storage containers and considered making a trifle. Then for some reason I started thinking about cheesecake…not regular New York style cheesecake, but the cheesecake my mom used to make. Unlike the dense, thick cheesecake you get in restaurants (which I have grown to love for its own sake over the years), Mom’s cheesecake was light and airy, and actually served in pie form with a delicious Nilla wafer crust.
I got the recipe from Mom several years ago, but rarely make the cheesecake since until very recently I was the only one in the house who liked cream cheese (now I can count on Zacky to help me out). However, by the time I got to the store my mouth was watering for the cheesecake and I decided it was Going To Happen…I had just about forgotten about the leftover cake. It wasn’t until I had my cream cheese in hand and was heading for the strawberries (Mom served it with cherry pie filling on top, but I prefer fresh strawberries if I can get them) that inspiration struck: what if I used the light, airy cheesecake filling in place of whipped cream and used the strawberries and leftover cake to make strawberry shortcake? Genius!
The whipped cream element of strawberry shortcake has always, in my opinion, been the weak link in the dessert. Unless you have something incredibly delicate as a base, like angel cake (which I do love), the whipped cream just gets totally overpowered. This slightly denser, cream cheese-y topping was absolutely perfect, especially with the heavier cake base I was using. The recipe is below, along with information on how I treated the strawberries (it being not quite truly strawberry season yet) and also the crust recipe, in case you don’t have extra cake lying around and just want to make the cheesecake.
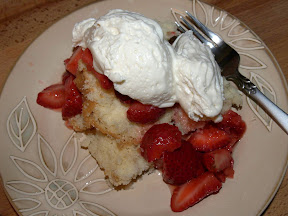
Excuse me while I devour this, won't you?
Recipe
Strawberries
- 2 qts fresh strawberries
- 0-1/3 c sugar
Remove tops of strawberries and cut into bite-size pieces. Add sugar to taste. If it’s mid-summer, you probably won’t need any. If it’s mid-winter, you may need as much as 1/3c. Using a potato masher, very slightly mash berries. You want to just mush them a little and get a little juice going, not make jam. Cover loosely (to keep bugs, domestic animals, and small children out) and leave on counter for 1-4 hours, until you see things getting saucy. NOTE: You can skip this bit if you want to serve right away, you just won’t have as much juice. Cover tightly and refrigerate until ready to serve.
Cheesecake Topping/Filling
- 1 pkg Dream Whip
- 1/2 c skim milk
- 1 1/2 tsp vanilla
- 8 oz cream cheese at room temp (low fat is okay, fat free is not — it gets lumpy)
- 1 c powdered sugar
Using electric mixer, beat together Dream Whip and milk according to package instructions (NOTE: don’t worry about the vanilla mentioned on the package, you’ll be adding it in the next step). Add softened cream cheese and vanilla and mix until smooth. Slowly add powdered sugar; continue mixing until completely blended. Refrigerate until ready to serve OR add to cooled pie crust (below) and refrigerate at least one hour to set.
Crumb Pie Crust
- 1 1/3 c vanilla wafers
- 1/4 c butter or margarine, melted (NOTE: the original recipe calls for margarine; I always use butter and it turns out fine)
- 1/4 c sugar
Preheat oven to 350°. Process wafers in food processor until they are fine crumbs. Combine crumbs with melted butter and sugar; mix well. Press evenly into 9″ pie plate. Bake at 350° 8-10 minutes, until edges just begin to brown.
From bench to boudoir
May 6, 2011 § Leave a comment
(ETA: This is the second of the three projects I mentioned in yesterday’s post.)

Inspiration
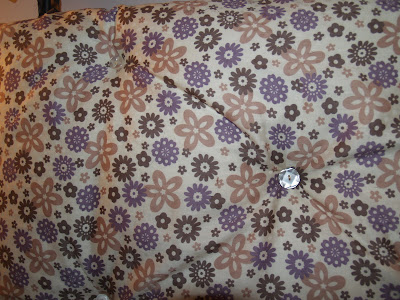
A few months ago I was flipping through a home dec magazine and came across a clever idea for a headboard. Since I was in the market for a headboard, I clipped it an added it to my idea wall. I decided the easiest way to get the look was to use a bench cushion. I kept my eyes open, but didn’t happen on anything suitable until a few weeks ago.
I was in IKEA, making my way to the one non-self-serve check-out that was open (I hate self-serve checkout. If I wanted to work in retail, I would. At the very least I should get a discount, since I’m doing the work of a checkout clerk they no longer have to pay. But I digress.) and there, right in the middle of a bunch of other completely unrelated stuff, was a single patio bench cushion. I figured it would be pretty cheap because, you know, IKEA. I was right: for $7.99 I finally had my headboard cushion.
The only thing was, it was covered it a very bright blue and purple striped fabric…definitely not something that would fit well in my lovely, tranquil boudoir. It’s pretty easy to recover a cushion, so I hit my fabric stash and came up with a great print that I bought last year on a business trip. Not only was it pretty, it coordinated beautifully with the fabrics I already had in the room and would serve as a great focal point — something the room had heretofore been lacking.
I didn’t have quite enough to cover the whole cushion, but I reasoned that there was one whole side of the cushion that would only be seen by the wall, so it didn’t really need to be covered. I also decided that since the cushion would get very little actual use (as opposed to if it were actually be used as a cushion), and since I was planning on using buttons to tuft it as in the original, I really only needed to tack down the edges.
Tufting accomplished with vintage buttons
I really love adding vintage touches to projects like this, so I dug into my button stash and came up with a bunch of buttons of different styles but similar sizes. I got the tufting done with minimal blood loss, and added on ties made from strips of the same fabric I used to make my curtains. Then I turned my attention to the “shelf” part of the project.
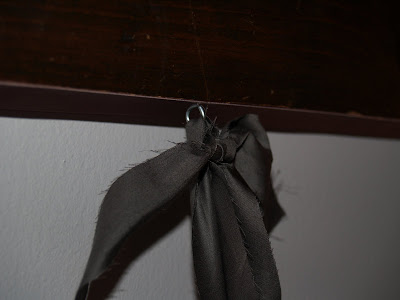
A close-up view of the tie
I really didn’t want to spend a lot of any money so I headed out to the garage where I found this perfectly sized, already finished piece of wood. Gotta love it when that happens. I originally thought to mount it perpendicular to the wall so it could serve as an actual shelf, but I didn’t want to spoil the look with brackets, and I didn’t have screws long enough to support it via holes drilled in the shelf, so I ended up just hanging it flat on the wall. I screwed a few small eye bolts across the bottom, and tied my cushion on.
Now I have a great, inexpensive headboard that also serves as a focal point for the room and — to my delight — a comfortable back and head rest when I’m sitting and reading in bed.

Works beautifully, dontcha think?
Done, done, and done
May 5, 2011 § 2 Comments
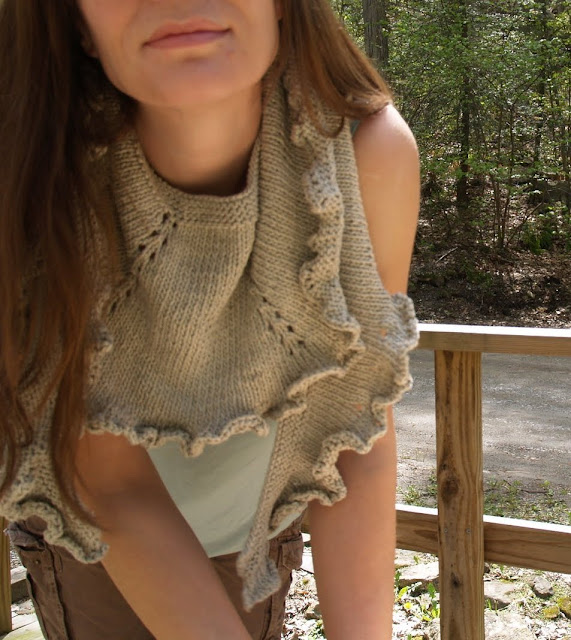
Last weekend was one for finishing projects, apparently. I finished not one, not two, but three projects…and that’s not even counting the castle cake! I’m really pleased with all of them, but I think the one that pleased me the most was my Little Easy Shawl. The only change I made to the pattern was the yarn (I used Lion Organic Cotton in Cypress), and it really was a delight to make from start to finish. I even love the way the holes from the (unwrapped) short row ends make a great set of eyelets going across the ruffle. I went outside to take some pics, and discovered it’s even more versatile and adorable than I thought. I’ll let the photos speak for themselves. (The other two projects will get their very own posts, coming soon!)

Neck wrap
Neck wrap, closeup

Sideways wrap around the shoulders
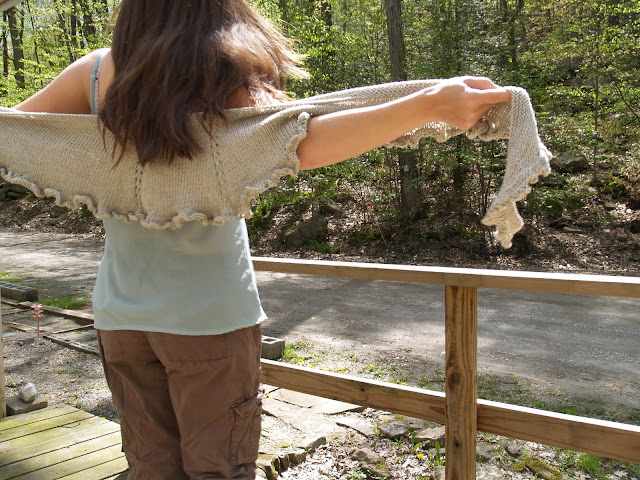
Back view
I also got a little bloggy maintenance done…the Recipes page is fully functional now, and I’ve added the first pattern to the Patterns and Projects page. I hope to get all of my current patterns transitioned over in the next week, and that new hat pattern I promised is on its way!
Quick lunch
May 3, 2011 § Leave a comment

Delicious!
I wasn’t super hungry for lunch today, so I grabbed a couple of pieces of homemade bread, spread a little (okay, a lot) of goat cheese on each slice, popped them in the toaster oven for a few minutes and then sprinkled them with basil. This is one of the most delicious meals I’ve ever eaten — definitely a keeper! And on smaller slices it’d be a great snack, too.
Let them eat cake
May 2, 2011 § 4 Comments
Some of my fondest childhood memories are of the birthday cakes my mother baked for me. A few that stand out are the “doll” cake (if you’re unfamiliar, the cake is mounded and has a hole in the center where the doll goes — it comes about up to the doll’s waist — and the cake and the doll’s upper half are frosted to look like a ballgown), the bunny cake (shaped pan, and a bajillion little frosting dots to decorate it), and when I was a little older, a delicious poppy-seed cake. Whatever I asked for, Mom made, and I always loved it. I’ve continued this tradition with my kids, especially Becky (mostly because Zack hasn’t had a party yet that wasn’t just family).

The Force is strong in this one
First there was the Darth Vader cake, which was also my first experience with fondant (I cheated and used the DV cake pan to mold the fondant. I also bought enough to make two cakes so I could practice, which turned out to be a Very Smart Idea.). To be fair, that was really the cake Mommy wanted to make — Becky only cared that the cake was blue, which — thanks to the miracle of food coloring — it was.
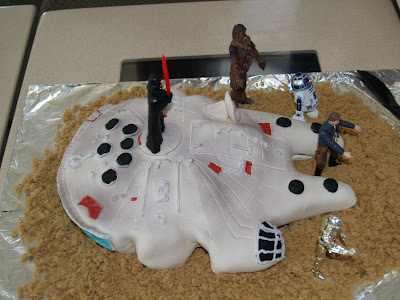
"She may not look like much..."
Last year, though, she requested a Millennium Falcon cake. This was considerably more challenging as I had to actually sculpt the cake. I got it done, though, and am still pretty proud of the job I did on that one.
This year, she wanted an Ariel cake. In case you don’t have a small girl-child, Ariel is the name Disney execs gave to the Little Mermaid when they bastardized the classic Hans Christian Andersen tale (the irony of my daughter loving the movie that completely ruined my favorite childhood fairytale is not lost on me). I am always up for a challenge, but I also know my limitations, and “cake shaped like a mermaid” is definitely outside my artistic range. So I suggested that perhaps we do something similar to last year’s Millennium Falcon cake and instead of Ariel herself, the cake could be a castle and then we’d just have the action figures, which would later be hers to play with. She readily agreed (Mommy is no dummy — I knew I’d get her with the toys), but asked that the cake be pink. Not a problem.

One of the castle cakes, pre-frosting
See, I knew that Williams-Sonoma had a cake pan that’s actually shaped like a castle, and I figured I’d just pull the same trick I did with the Darth Vader cake pan. This was going to be easy. Except it never is. First, it turned out that the castle cake pan is smallish. This one was easily solved…I’d just make a 13×9 sheet cake base. Not a problem. I decided to frost the sheet cake to look like the ocean and then decorate with aquarium plants to really give it that “under the sea” vibe. Once Becky found out there would be two cakes, she requested that the base be strawberry and the castle be vanilla. Also not a problem. I baked both cakes (from a mix — I’m still working on perfecting my cake baking skills) Thursday night so they’d be nice and cool for me to decorate Friday night and ready to go Saturday (her party was at one, but I wanted plenty of cushion built into the schedule).
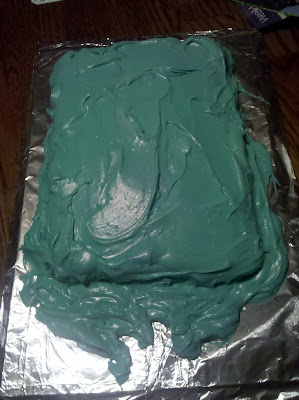
The frosted base cake.
Friday night rolled around and I got the frosting made (cream cheese, because the birthday girl digs it) and the base cake frosted (after repairing the giant hole in the middle where it stuck to the pan). The rest of the evening went a bit like this: Roll out the hot pink fondant and try to put it into cake pan. No good — couldn’t get it down into the pan without tearing it. Reroll and drape over cake, then put pan over cake. Still no good — the details on the cake pan were just too fine and delicate to show without there being plenty of pressure to make an impression. Press cake down into pan in attempt to get impressions. Cake and fondant both ruined. Curse loudly and colorfully and send Daddy to the store for more cake mix and cream cheese (because clearly fondant ain’t going to cut it, and now aren’t I glad that I bought that cake decorator gun on clearance last month?). Mix new cake, pour into pan and put into oven, sit down on couch to relax. Realize ten minutes in that I forgot to grease and flour the “nonstick” pan and cross fingers that it really is “nonstick” but it’s already almost midnight so I won’t find out until morning.
Morning comes and I attempt to remove the cake from the pan. I’m not really sure what they mean by “non-stick” but it’s definitely not related to whether the contents of the pan will stick to the pan, because they will, quite tenaciously. More cursing, and also being glad that Daddy got two cake mixes when he went to the store the previous evening. Third cake mixed, pan prepped (I can be taught), into the oven. From the oven immediately into the fridge, where it has plenty of time to cool while I whip up another batch of frosting. Most of the frosting gets tinted pink, with a little set aside for brown (the door), light blue (windows), and lavender (trim). Cake is cooled, pops right out of pan and I plunk it down on the frosted base.

Look! A pink castle! (Pre-accessorization, obviously.)
Now is the moment of truth. See, I really don’t have a lot of any experience frosting things in a decorative manner, but I really, really want to preserve as much of the stone detailing as possible on the castle — that’s what makes it so neat. So I try a few shots on a plate for practice and it looks pretty good. Time for the real thing…and it worked! It came out really great. I will say that cream cheese frosting is not the best choice for elaborate frosting stuff like this — it’s a little too soft, which is why the castle looks a little melty. But really, I love how it came out. It got lots of oohs and aahs, and two of the moms at the party asked where I bought it!!! Most importantly, Becky absolutely loved it.

And here it is again, fully accessorized.

One awesome cake, one happy birthday girl.
Zack has already requested a train for his birthday in November. Should be fun!
