I Like Cheesy Buns and I Cannot Lie
January 15, 2014 § 1 Comment
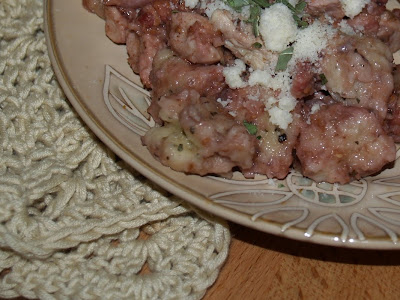
The backstory: Kit has had to go gluten free. Like, extremely gluten free. I like to call him a Gluten Freek. The tiniest eensiest little bit of gluteny goodness — even just from cross-contamination — will double him right over with stomach cramps. So, he’s been missing a lot of his favorite foods, especially stuff we typically get got in restaurants, like burgers and fries. A few months ago, we discovered that the kids’ favorite stop on the way up to Boston, Maggie McFly’s, has an extensive GF menu and a dedicated GF fryer. And for the “bun” on the burgers, instead of the regular GF buns like he’s been getting at the store, they have this amazing GF cheesy flatbread stuff. It’s so good I’ve started ordering my burgers with them, too.
I looked for a recipe for bread like this with no success, and then about a month ago, one came across my interwebs (I think on Twitter, but I’m honestly not sure). I tried it out last month and it came out pretty good, if a little greasy. This time, it’s pretty much perfect. The original recipe I found calls for tapioca flour, which it turns out I can’t use, as even the smell of it triggers my gag reflex (even just the little bit in GF all-purpose mixes). He talked a lot about the fine, silky texture of the tapioca flour, and I thought rice flour might substitute in nicely. Sure enough, it subs right in. Now, mine don’t look all pretty and puffy like in the pictures over at the original recipe, I assume because of the different flour. But, since we really want to use them for sandwiches, that actually works in my favor.
The hardest part about this dough is getting the texture right. It needs to be, once you’ve added everything in, moist enough to hold together but only just. Any moister, and you’re going to end up with the (admittedly delicious) greaseballs I had the first time. The key to this is the flour — the different flours seem to absorb moisture at different rates, even just different batches of the same type of flour. I used the exact same type and amount of flour this time as when I had the too-moist dough last time, and ended up having to remoisten the dough a little by adding more milk at the end.

Ingredients:
- 4 Tbsp butter
- 1 c. milk
- 1/4 c. vegetable oil
- 3 1/2 c. Rice Flour (-ish — due to variations in absorbency, you may need more or less flour)
- 2 eggs, slightly beaten
- 1 c. shredded mozzarella
- 1/4 c. shredded cheddar
Preheat oven to 350°. Line a baking sheet with parchment paper.
In a dutch oven or other large pot, melt butter. Allow butter to brown slightly but not burn.
Add milk and oil. Bring to boil, stirring frequently.
As soon as the mixture boils, remove from heat.
Add flour, mixing well. Mixture should be fairly dry and crumbly at this point.
Stir in eggs and both cheeses. Mixture should be smooth and slightly shiny.
If mixture is too dry, add additional milk in 2 Tbsp increments, stirring well after each addition, until mixture holds together. Do not over moisten.
Form dough into discs 3-4″ in diameter and about 1/2″ thick. Place on parchment lined baking sheet and bake for 20-25 minutes. Dough will lose its shininess and you may see errant pieces of cheese begin to brown.
Let cool before serving. These are best slightly warm but quite good at room temperature or even cold for a quick snack.
Sacre bleu cheese!
May 24, 2012 § Leave a comment
Delish.
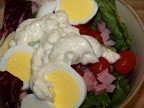
I’ve been eating a lot of green salad lately (mostly Romaine, arugula, and baby spinach, for those of you keeping track at home), and thus a lot of salad dressing. My absolute favorite has always been Bleu Cheese. When I was a little girl, restaurants charged thirty-five cents extra for it, and my dad groused about paying it, but I wouldn’t budge. For me it was Bleu Cheese or no salad, end of discussion. So I’ve been going through a lot of Bleu Cheese dressing lately, and I figured I’d save myself some chemicals and maybe some money, too, and make my own. So I did! It’s super creamy (maybe even a little too much, but I don’t mind it thick) and really rich and delicious. I’m almost done with my first batch…I’m thinking I might add some bacon to batch two. Because why not?
Ingredients:
- 1 15oz jar Hellman’s Light Mayonnaise
- 1/3 c. plain Greek yogurt (I used Chobani)
- 1/4 c. olive oil
- 2 tsp. roasted garlic rice wine vinegar
- 4 oz. crumbled bleu cheese
Whisk together mayo, yogurt, oil, and vinegar until thoroughly combined. Stir in bleu cheese. Top your salad!
Things that make me say “y’all”
May 1, 2012 § 1 Comment

Been wondering what awesome looks like? This is it, right here.
I’m not sure if I’ve mentioned it here or not, but as a general rule I have not been fond of seafood. Fish and chips (it’s battered and fried — what’s not to like?), yes, but otherwise, not so much. As I’ve been cooking more, though, I’ve been reading recipes and descriptions of seafood that just sounds delicious. So over the past couple of years, I’ve been making an effort to try more seafood, both different types and different preparations. There was that salmon a while back, which was pretty tasty, but I don’t think I’m going to become a regular salmon eater. A few months ago, though, I discovered shrimp, in all its shrimpy goodness and glory, and now I find myself craving shrimp once or twice a week (at least).
Now, I do have very specific needs when it comes to shrimp: they must be warm, and they must be either small or cut up into bite-sized chunks. No Jumbo Shrimp for me, thankyouverymuch. But, as long as those conditions are met, I adore shrimp. I especially adore shrimp when they’re all Southern’ed up… barbecued, for instance. So I was pretty excited when Michael Ruhlman’s recipe for butter-poached shrimp served over bacon grits came across my interwebs.
Y’all. I cannot even tell you how mind-blowingly delicious this is. I did change it up just a skosh from Mr. Ruhlman’s recipe, namely by adding cheese to the grits and leaving out the onion. Also, since I added the cheese, it wasn’t necessary to add the butter from the poaching (don’t worry — it didn’t go to waste…I used it later when I needed to make a roux for my gumbo, which I will tell you all about in another post). I also adjusted the timing a little, and I halved the recipe (which ended up being about 2 servings for me). Here’s how I did it:
(adapted from Ruhlman’s Twenty: 20 Techniques 100 Recipes A Cook’s Manifesto by Michael Ruhlman, as reprinted on publicradio.org)
Ingredients:
- 1 c water
- 1/4 c old fashioned grits (NOT instant. Seriously, y’all. If you’re gonna use instant grits you might as well just stop right now.)
- 1/2 c diced bacon, cooked
- 1/4 c shredded sharp cheddar cheese
- 1/2 c butter
- 1/2 lb shrimp, peeled and deveined
In small saucepan, bring water to a boil. Add grits and stir, then cover and reduce heat to medium low. Let cook for at least 25 minutes, stirring frequently.
When the grits have about 5 minutes left, melt butter a couple of tablespoons at a time in a saucepan just large enough to hold your shrimp (I used a 3qt saucepan for the 1/2 lb), stirring constantly. When all of the butter is melted, add the shrimp and cook for about 5 minutes. Shrimp should be cooked through. Remove from heat.
While the shrimp are poaching, uncover the grits and and stir in the bacon, heating it through. Remove from heat and stir in the cheese until melted. Plate the grits, then spoon the shrimp over them.
April 13, 2012 § Leave a comment
In case you didn’t know, yesterday was National Grilled Cheese Sandwich Day. Thusly inspired, I popped this into the toaster oven last night for a quickie open-faced grilled-ham’n’cheese:
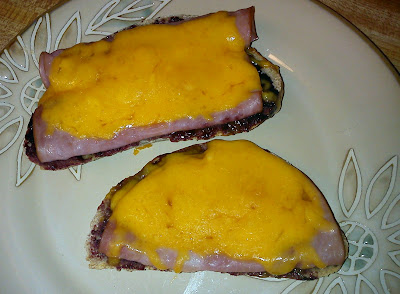
Fast, easy, delicious. How can you argue with that?
Bet you’re wondering what that dark layer on the bottom is…that would be raspberry jam, my friend, evoking the flavors of a Monte Cristo with none of the labor. Win!
Cake-tacular!
November 15, 2011 § 2 Comments

Cake shown with glaze and berries
It occurs to me that my practice of linking to online recipes rather than including them here is likely to backfire on me at some point, when a recipe gets moved or the blog I found it on is gone, or any number of other things. So, from now on, I’ll be adding those recipes to the blog as well as linking to the source. The first one of these is a scrumptious, versatile, and just stupidly easy yogurt cake, which I discovered via the magic of Pinterest. (I’ve also added my go-to bread, blackberry cobbler, and lime cupcakes to the Recipes page, so those are there now.)
The recipe I found was modified from a recipe found on another site, but I went ahead and modified it even further. I’ve made this recipe twice now, and both times I used the 170ml size yogurt that’s commonly available here in the US (I used Chobani both times, honey flavor the first time and strawberry the second). I also just used regular ol’ sugar, though the original recipe calls for caster sugar (which is much finer than regular granulated sugar). Finally, the biggest mod I made was, the first time, an accident.
Zacky and I were in the middle of throwing our ingredients into the bowl, and I popped open the fridge to grab the milk…which we were out of. We had already added both wet and dry ingredients, so stopping for a trip to the market wasn’t really an option. I asked myself: what do I have that’s liquid and non-alcoholic? The answer: apple juice. My biggest concern was for the texture of the cake, and I have to tell you, it came out incredibly moist. It was dense without being heavy, had a nice crumb while still being silky on the tongue. I so ❤ this cake. That one got eaten without any glaze or anything.
This past weekend, we had another shindig to go to and I decided to bake another one of these cakes, only to take it a step further and go with OJ, which I also used for the liquid in the glaze. As noted above, I used strawberry yogurt this time and also put some lightly macerated berries between the layers and on top. So good. Oh — one more thing: the first time, I baked the cake in an angel food cake pan, and this time I baked two rounds. Both came out just fine.
I’m gonna make another one for the party we’re going to this weekend. I think I have finally found a go-to cake recipe, and I love that it’s so, so easy. Did I mention the best part? You use the yogurt cup for all your “cup” measurments, plus it’s a one bowl recipe. Love. It.
(originally discovered on The Boys Made Me Do It, via Pinterest)
Ingredients:
Note: YC = Yogurt Cup
- 1 YC yogurt
- 1 YC all purpose flour
- 2 YC self rising flour (make your own)
- 2 YC sugar
- 1 YC juice (you pick the flavor!)
- 1 YC vegetable oil
- 3 eggs
- 2 tsp baking powder
Pre-heat oven to 350°. Grease a bundt, angel food cake, or two 9″ round pans. Mix all ingredients until smooth. Pour batter into prepared pan(s). Bake for 40-50 minutes (a toothpick inserted halfway between edge and center should come out clean). Allow to cool in pans, then remove and top as desired.
It’s Not Always About You
November 1, 2011 § Leave a comment
While skimming through posts to move over to this blog, I came across this pasta recipe that I posted over on the old blog. There is no accompanying post, but I know I posted it so I could find it again, because the pasta recipe in my Italian cookbook is kinda meh and doesn’t come together as nicely as this one. And then, of course, I promptly forgot I had done that. So, when I came across it today I thought, “Hey! I should totally put that on TD!” and so I am, because that seemed like a Really Good Idea(tm) to me, and also, will work out nicely when I put the meat sauce recipe up later this week (or possibly next week — we are still without power from the storm so I’m trying to cram getting everything done into the very limited daylight hours I have available to me). Mostly, I’m putting it over here so I can find it again (if I remember to look here instead of in a cookbook!), but you are welcome to share the fruits of my labors.
Without further ado, here is my go-to pasta recipe:
(adapted from Tyler Florence’s Pasta Dough for Ravioli)
Ingredients:
- 1 3/4 c all-purpose flour, plus more for dusting
- 1/4 c grated pecorino romano cheese
- 1 tsp salt
- 3 large eggs, plus 1 for egg wash
- 2 Tbsp extra-virgin olive oil
- 1 Tbsp water
Combine flour, cheese, and salt in mixer w/ dough hook. Add one egg at a time, mixing continually. Add oil. Continue mixing until dough forms a ball.
Dust work surface with flour. Turn dough out onto surface and work for 5-10 minutes, until dough is elastic. Form into a ball, wrap in plastic, and let rest for 30 minutes.
Divide dough in half and rewrap one half (to avoid drying). Form other half into a rectangle and run through pasta machine on widest setting 2-3 times. Run through middle setting 1-2 times, flouring as necessary. Lay rectangle out on floured work surface. Brush with egg wash (made by beating one egg w/ 1 Tbsp water).
For raviolis:
Dot with filling app. 1″ apart 1/4 – 1/2″ from one long edge of pasta. Fold strip over to enclose filling. Press air out around filling. Cut apart with sharp knife. Crimp edges with fork tine. Boil for 4 minutes in well salted water.
Expanding My Horizons
August 24, 2011 § 4 Comments
And my waistline, but so, so worth it. I came across this thing called Taste & Create a few months ago, where people make food from each other’s blogs (you sign up and get assigned a partner each month — it’s very cool). I decided to participate for the first time this month, and my partner was Always Eat On the Good China. The hardest part was choosing a recipe to make (and I’m totally going to make more of them — she has some really nommy sounding stuff!) but I finally settled on the Chicken Puffs. Chicken, bacon, cheese, puff pastry…what could possibly go wrong? Nothing, in this case. They were amazing.

Delish.
I did modify the recipe a little to use what I had on hand (for example, I used goat cheese instead of cream cheese), and since I’m not a huge fan of plain chicken, I also decided to play around with marinades* and tried something new: OJ and balsamic vinegar. Yeah, that’s a keeper (1c. OJ + 1 Tbsp BV to cover about 1.5lbs of cubed chicken). She mentions in her post about the recipe that although the pic shows a whole chicken breast, she now cuts it into bite size chunks, so I went that way with it. And I didn’t mix anything up for the cream cheese mixture — I just threw a bunch of goat cheese on top and then topped it with some fresh basil, because I am lazy. Oh! Also instead of spraying my cookie sheet I just lined it with parchment paper which works beautifully for keeping stuff from sticking. And I didn’t brush with the egg wash, but that was just because I totally forgot to do it. Seemed to come out fine, but they would’ve been a little crispier with the wash.
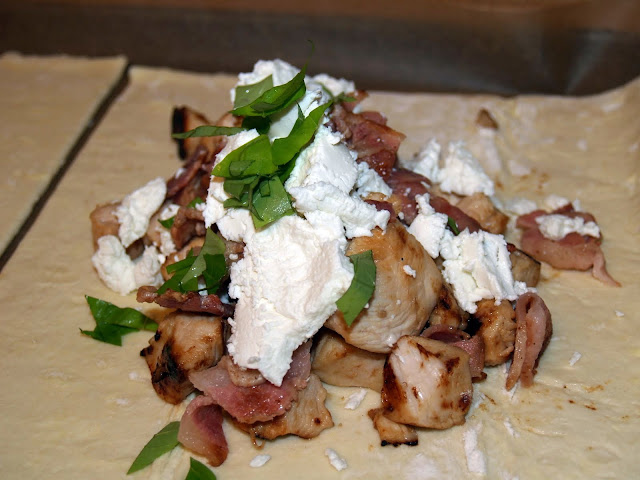
The pile of nommy stuff going into the middle of the puff: chicken, goat cheese, bacon, fresh basil.
So, modifications I’ll probably make next time I make this (because there will be a next time): First off, I think I’m going to try it as a pot-pie kind of thing…the puff pastry-to-filling ratio is just really high. Now, it’s puff pastry, so it’s not like my tastebuds are complaining, but I think it will be just as tasty topped with the puff instead of surrounded by it. Second — you might want to sit down for this one — I’m going to leave the bacon out. I just really didn’t feel like it added much to the flavor experience in this case. Weird, I know, but there you are. I also will probably try different marinade/cheese combos — I think this would be great with something spicy on the chicken and cheddar cheese, for instance. And there you have it…my first Taste & Create. This was tons of fun — I’m totally going to do it again next month!
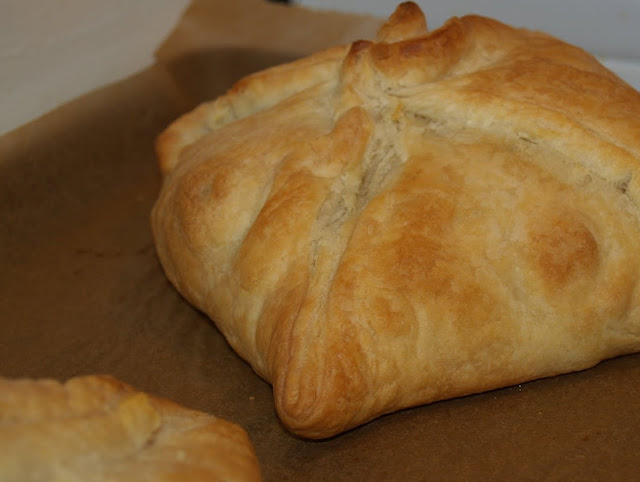
Fresh from the oven.
*A note on using a marinade on something you’re going to wrap in puff pastry and bake: you need to dry it out before you put it in the pastry. Throw it in a saute pan and brown it — you’ve got lots of sugar in this marinade, so even let it caramelize a bit. You don’t need to worry so much about it being cooked through — the baking in the oven part will take care of that. And it won’t get too dry b/c you’ve added all that moisture to it.
I didn’t say chicken, I said kick his butt!
August 17, 2011 § 2 Comments
This weekend I was in a “play around in the kitchen” kind of mood, and I was also in a “chicken and mushrooms” kind of mood. I originally thought I might make a chicken marsala, but I didn’t have wine on hand and didn’t feel like stopping to get any, so I decided to use the beer I did have. I also felt like playing with spices a little instead of just dosing everything with oregano and basil (though you know I do love my basil). What I came up with ended up tasting pretty much like I expected — and wanted — it to taste, so this one’s a definite keeper. And it’s ridiculously easy, too, so bonus!

Noms.
This dish is great served over rice or pasta and topped with a little cheese. It has a very rich but subtle flavor, so a sharp or strongly flavored cheese really stands out nicely (I threw on some sharp cheddar the first night and then used some shaved asiago on the leftovers. Both were quite tasty).
Recipe
Ingredients:
- 1 lb. chicken, give or take
- 1 lb. crimini or portabello mushrooms, give or take
- 1 12oz. bottle of beer (I used Honey Brown because it’s what I had on hand)
- 1 tsp dry ground mustard
- 1 tsp paprika
- 3 Tbsp butter
- app. 1 Tbsp flour, if necessary
Cube chicken and slice mushrooms (I sliced the mushrooms while the chicken was cooking). Pour 3/4 of the beer into a saute pan and heat to simmering. Add mustard, paprika, and chicken. Allow chicken to simmer in liquid until cooked through. Remove from pan with a slotted spoon, leaving as much liquid as possible in the pan. Add butter to the remaining liquid and allow to melt. Add the remaining beer and allow to heat back up to simmer. Add mushrooms and cook through. If the liquid is still a bit thin, thicken with flour as desired.
And why do we fall, Bruce?
July 7, 2011 § Leave a comment
My parents were pretty awesome, but I think the best gift they gave me was the confidence to try and fail. I’ve been playing in the kitchen since I can remember, mostly baking but really just making anything that struck my fancy. My mom had a bunch of cookbooks that I always enjoyed leafing through, and a big ziploc bag full of loose recipes. I was never afraid to pick out one of those recipes, change the things I didn’t think I’d like or add something I thought would improve it. I had a pretty decent success rate, and I learned good lessons from most of my failures.
Eventually I grew confident enough to just start randomly throwing ingredients together, and though I don’t do it often (because even though it’s playing, it’s still a lot of work, so if I did it all the time it wouldn’t be a treat anymore) it is truly one of my very favorite things in the world to do. I feel strong and powerful and knowledgeable…I feel much like I imagine a wizard would: I can make magic in my kitchen, but there’s always the chance that I’ll (hopefully only figuratively) blow the whole thing to smithereens, too.
Tastes better than it looks, I swear.
Last week, the mood struck me. I wanted to cook, and I didn’t want to make the same old thing, or even a new variation on a known recipe. I wanted to play. I had some ingredients in mind: chicken, bacon, and cheese (go ahead, show me your surprised face), but had no idea what I wanted to do with them. I was thinking maybe pound out the chicken and then just wrap the bacon and cheese inside. Tasty, but a bit boring.
Then I came across this recipe for a ricotta-based gnocchi that the OP had sauteed to give it a quick crisp, and it sounded pretty tasty, except I don’t like salt and pepper so I decided to substitute basil, which I like very much. I also ended up changing the second cheese in the gnocchi from parmesan to asiago to get a little stronger flavor, which worked very well, and it was super fun to make. It’s definitely a keeper as-is (though my timing got a little frazzled at the end and I didn’t have a chance to crisp it like the OP — I’ll give that a try next time).
I decided I’d chuck the bacon and just do the chicken and gnocchi with maybe some butter and parm on top. Then when I was at the store to pick up the ingredients for the forthcoming feast, I spotted raspberries on sale. Serious sale. Like super crazy cheap. I had a Eureka! moment in which I knew that there would be a raspberry bacon sauce to go over the gnocchi and chicken. Perfect.
Except not so much. I’m going to call this one an 85% success. All of the parts worked, but they just weren’t right together, so I’m going to split the recipes and give them to you separately. The biggest problem was that the raspberry flavor was just overpowering (and also as a minor issue gave everything a kind of weird pink color). I think if I toned it down with a little cream it would actually be pretty great in a savory dish like this, but as is it would be a perfect topper for waffles, pancakes, or ice cream.
The chicken I just sauteed, and I don’t think it was at all necessary to the final dish, so I’m not going to include lengthy instructions here. Basically, if you want chicken along with your gnocchi, cube it up and saute it until it’s cooked through.
Recipe – Gnocchi
Ingredients:
- 2c. low fat ricotta cheese
- 2c. asiago cheese
- 2 eggs
- 2Tbsp. basil (Note: I recommend you use freshly chopped or freeze dried if possible)
- 1 1/4c. flour
- 4qts water
Bring water to a boil. Combine both cheeses, the eggs, and the basil. Mix until thoroughly combined, then slowly add flour until dough is soft and still a little sticky. Grab a handful of dough and roll into a rope about 1″ thick. Pinch off pieces of the rope to create pillows about 1″ square. Place on parchment or silpat until you have about half the dough ready to go, then place in pot. Boil for 3-4 minutes, until dough floats to surface. Remove cooked gnocchi from boiling water with a slotted spoon. While the first batch is boiling, create a second batch in the same way and proceed to boil them after removing the first batch from the water.
Recipe – Raspberry Bacon Sauce
Ingredients:
- 2qt. fresh raspberries
- 3Tbsp butter
- 1Tbsp soy sauce
- 1Tbsp Balsamic Vinegar
- 1 lb. bacon, cooked and diced (Note: if you dice the bacon raw just by cutting across the slices then cook it, you’ll save yourself a lot of burned fingers.)
Using a potato masher or fork, slightly mascerate berries and let sit at room temperature for about an hour. Melt butter in 3qt saucepan. Add berries, soy sauce, and vinegar. Bring to a boil stirring occasionally. Let sauce remain at a full boil for 1 minute, then reduce to a simmer for 10-20 minutes. Sauce should be reduced and thickened. Toss bacon in sauce and serve.
