Yes, I know it’s already Wednesday
May 30, 2012 § Leave a comment
But it’s sort of Tuesday because Monday was a holiday, right? And also I’m being lazy and re-using a post from the old A Frayed Knot blog. But it is both relevant, because after writing this post I did find a great local farm store, but just heard this past week that they’re closing their doors, which is sad and also leaves me once again without a local produce source. Anyhow, here’s your Tasty Tuesday post:
Originally published in A Frayed Knot Knits on July 7, 2009
Sometime last year, I read a book called The Omnivore’s Dilemma, by Michael Pollan. It’s quite good, and I recommend it if you’re interested in where your food comes from. I found it much more compelling than a similar book, Fast Food Nation, as I don’t actually eat fast food all that often (once or twice a year) so being grossed out by the fast food industry’s practices was, well, gross, but didn’t really give me any information about changes I could make to my own personal habits. TOD, on the other hand, looks at food from three different sources: industrial farms, small growers, and hunting/growing/gathering your own. Pollan even takes the time to point out the many similarities between large-scale organic growers and non-organic industrial farming — things you’ll want to take into consideration if you’re really concerned about your food and how it relates to your own health as well as the environment. Which is all a really long way of saying that I’ve decided to try to eat more local food, especially produce.
Last weekend, I asked Kit to take me to one of our local farms. They have a petting zoo, so it’s kind of perfect for the kids. He took the kids up to visit the animals while I perused the produce in the farm store. What I found was really, really disappointing: very few things they were selling were actually grown there. I got some carrots (which, OMG, why didn’t someone tell me how amazing fresh carrots are?), some celery, and some mushrooms (which I apparently don’t know how to store because they went all ooky before I had a chance to use them). I believe the blueberries were also grown there. Everything else was from some place else. The peaches were at least New Jersey grown, but the strawberries were the same old big name farm berries they have at my A&P, the apples were from Chile, and most of the other fruit was from California. They also had pineapples and bananas, which were obviously not from around here, and the grape tomatoes I bought were from Florida. They did have some regular tomatoes that I think were grown there, as well as some lettuces and other veggies that I didn’t buy — I was just surprised at how much produce they offered that was not only not from their own farm, but not in any way local. So that was a really disappointing attempt at buying local produce. There are a couple of other farm stores in reasonable driving distance, so I’ll try those next and hope for better results.
One of the big reasons I’m doing all this is to try to introduce the kids to good fresh fruits and veggies. Zack will eat pretty much anything — he’ll try everything, and most things he actually likes and will eat lots of — but we’ve had lots of issues with getting Becky to try things. To be clear, it’s not that she won’t try “healthy” things — we have trouble getting her to try anything. She doesn’t respond to bribes (even crazy ones, like eat one pea and get a whole cookie), and I’m loathe to actually punish her for not eating something she didn’t request. It’s incredibly frustrating and we’re constantly trying new things. One thing we’ve incorporated is an idea from friends of ours who have a daughter about the same age as Becky: when dinner is served, she may eat what is on her plate OR if she tries it and doesn’t like it, she may request a (reasonable) alternative that she does like. If she doesn’t try it, though, she goes to bed hungry. We’ve been trying that for a few weeks now, with little success — Becky gets so involved in saying “no” and throwing a tantrum that I think she doesn’t really realize what she’s saying no to. So I came up with a new idea to add on: we’re going to do a menu each week [Note from present-day-me: this was a short-lived idea that didn’t work out for us after I got all employed and stuff]. One day a week she gets to choose what we eat, and on the other days, I’ll serve whatever we’re having for dinner and the previous rule applies. This allows me to tell her well in advance what we’re having for dinner, which allows her time to get used to the idea. Last night was our first menu dinner (meatballs and noodles for “International Monday” served alongside some frozen veggies), and Becky even helped prepare everything. She decided not to try anything on her plate, but she was very calm and polite about it, which is a big improvement. She didn’t eat much all day so I wasn’t terrifically surprised that she didn’t go for the deal, but I was very pleased with her behavior, at least.
Tonight we’re having tostadas for “Try Something New Tuesdays” — technically, I served tostadas Sunday, but nobody was prepared for them and there was a tantrum and I think we might do better tonight. I had one for lunch yesterday, topped with a few diced grape tomatoes — yummy!

The base is a fresh corn tortilla that I fried myself in vegetable oil, so I feel better about it than commercially fried and salted chips. There’s also some whole corn hiding in there between the beef and the cheese.
PDM again: Glad I found this post — I’d completely forgotten about these and now I want them. And I’m pretty sure Zacky would chow down on them, too!
Found It on the Internet Friday #13
May 25, 2012 § Leave a comment
Yes, Found It on the Internet Friday is back, baby! Woohoo!

This week, I made a Rapunzel wig for my daughter. A few weeks ago, she told me that they would be having “Dress as Your Favorite Character” day at school, and she really wanted to be Rapunzel but [insert tear-filled big brown eyes and a suitably pitiful expression here] her hair was too short. I’d seen Rapunzel wigs around on the interwubs, and even Pinned a couple with the intention of making one for her someday. Looked like “someday” had arrived.
I obtained yarn (3 balls of Lion Brand Baby’s First — a bulky cotton acrylic blend that’s nice and soft and just the right color yellow along with a single novelty oddball in the same color for a little texture) and studied the tutorials.
The first step was to get the yarn out of the balls and into suitably long strands. To make as per the tutorials (which I didn’t, but more on that later) you want the strands to actually be twice as long as the desired length of the hair, as one half will be on one side of the head and the other half will be on the other side. The easiest way to do this is to wrap the yarn around a tall piece of cardboard like you’re making a giant tassel (note to self: hmmmmm…giant tassel might be an interesting decorative element). I still had the display from Becky’s science fair project, which is about 3′ tall — perfect.
After winding all of the yarn off (important note: you want all of the yarn ends to be at the same end of the cardboard), I used a piece of waste yarn to tie the bundle together loosely at one end (opposite where you ended the balls) and then cut the other end open. Now it was time to sew it onto the base.
Ah, the base. So, the first tutorial I found indicated one would need a wig cap. I did not have time to obtain such a thing. Another tutorial suggested using the cutoff sleeve of an old t-shirt. This I could do. I cut the sleeve off and sewed the end shut, then tried it on Becky’s head, and it fit. Awesome! I took my bundle of “hair” and centered it on the cap, then used my machine to sew right down the middle, front to back (you could totally do this by hand but it would be tedious and I hate hand sewing with a white hot passion anyhow).
I put it on my phrenology head and braided the hair, then tried it on Becky again. No good. Couldn’t get it to stay on her head. I thought maybe I’d started the braid too far up, so I took that out and started it lower (leaving the hair at the top looser so the cap would have room to stretch). Still no good. Maybe the cap isn’t deep enough? Perhaps if we sewed it to a hat we knew fit?
So I was looking for an old winter hat of hers to tack the thing to, and came across the hat from her candycorn costume (how did I not blog this?!?! Clearly that’s going to have to happen.). Perfect! I sat down and sewed the tshirt cap onto the candycorn cap BY HAND, even. Still no good. Can’t get it to stay on her head, even with no braid. Sigh. Epiphany: I shouldn’t craft while sleep deprived, because I sewed the too-tight thing on to the big-enough thing, making the big-enough thing now too-tight. Duh.
As I sat down to rip the whole thing out so I could sew the hair directly onto the candycorn cap, it occurred to me that there was no need to actually unsew the hair…that in fact leaving it attached to a strip of the tshirt material would make it easier to sew back down. So that’s what I did (if I was doing it again and starting from this point instead of screwing up twice on the way, I’d sew it flat to a strip of material then proceed from there). Then as I was getting ready to attach it front to back again, I had another epiphany: What if, instead of front to back, I attached the hair from side to side around the front of the base of the cap? I pinned it to check if it would work and YES! Beautiful! And much easier to sew! (Except I kept not paying attention and getting strands stuck so the machine needle kept breaking and flying into my face. XTreme Crafting at its finest.)
So, I got the hair back on — above the elastic so I’d still have the stretch — and tried it on the Girl Child. It fit. It stayed on even when she walked around a little. YAAAAAYYYY! Got it braided (I did start too high the first time and had to redo it, but that was no big deal) and it still stayed on. Finally, success! My reward? This smile:

Yep. Totally worth it.
The two changes I want to make are: a) because of the way the hair falls you can see the wig cap in some spots. However, this will be a pretty easy fix — I just need to arrange the hair properly then overstitch it at the “hairline” so the strands don’t fall. Silly gravity. And b) because I needed to keep the stitching above the elastic to retain the stretch, there’s a big white band there. It passable as a “headband” but I’d like to put a ribbon over it and pretty it up a little. Both little things and easy to fix — we just didn’t have time before school this morning.
Sacre bleu cheese!
May 24, 2012 § Leave a comment
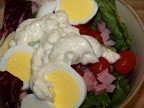
Delish.
I’ve been eating a lot of green salad lately (mostly Romaine, arugula, and baby spinach, for those of you keeping track at home), and thus a lot of salad dressing. My absolute favorite has always been Bleu Cheese. When I was a little girl, restaurants charged thirty-five cents extra for it, and my dad groused about paying it, but I wouldn’t budge. For me it was Bleu Cheese or no salad, end of discussion. So I’ve been going through a lot of Bleu Cheese dressing lately, and I figured I’d save myself some chemicals and maybe some money, too, and make my own. So I did! It’s super creamy (maybe even a little too much, but I don’t mind it thick) and really rich and delicious. I’m almost done with my first batch…I’m thinking I might add some bacon to batch two. Because why not?
Ingredients:
- 1 15oz jar Hellman’s Light Mayonnaise
- 1/3 c. plain Greek yogurt (I used Chobani)
- 1/4 c. olive oil
- 2 tsp. roasted garlic rice wine vinegar
- 4 oz. crumbled bleu cheese
Whisk together mayo, yogurt, oil, and vinegar until thoroughly combined. Stir in bleu cheese. Top your salad!
Sprung!
May 23, 2012 § Leave a comment

Pretty!
To give my hands and arms a rest from the massive amounts of knitting I’ve been doing lately, I decided a little crochet was in order. Something quick and easy and fun and Spring-y was just what I needed. When I came across Veronica O’Neil’s Bird of Prey I knew I’d found my project.
Obviously for Spring I didn’t want to do it in plain black (though I am definitely going to in the future — I could use a plain black shawl and this one is so easy!) and I happened to have some Hometown USA in Dallas Grey handy. I really didn’t want just plain grey, though, so I thought I’d add some colorful fringe. One ball of Monterey Lime later, there were some pretty green accents around my shawl, and it was starting to feel downright vernal. It still wasn’t quite enough, though…those long green fringes seemed to evoke stems, so I hunted up an easy flower pattern and grabbed some random bright bits and bobs and set to.
I ended up alternating green and grey fringe — all green was just way too much — and the flowers are 8 different colors. I had originally thought to put some flowers in the middle of the shawl as well, but decided I was done making flowers like it just fine like this. A couple of notes on the flowers: I found it much easier to end up in the right spot if I joined the petal color somewhere other than the beginning/end of the flower center, and I only did a single petal on each flower rather than the double given in the pattern (I just didn’t do the second repeat).

If this doesn’t say Spring, I don’t know what does.
The flowers actually took two or three times longer than the shawl, which only took me about 3 hours. 3. Hours. I know, right?!?! Because I am super slow and this was superfast. Now you see why I’m going to make one in black, too. Heck, I might make one in every single color of Hometown USA.
I apologize for the low quality phone pics…I forgot to grab my camera and I’m trying to be really good abotu not letting lack of awesome photos keep me from posting. Because that way lies Procrastination with a capital “P”. Hopefully someday there will be both regular posting AND awesome photos.
O. M. G.*
May 10, 2012 § 3 Comments
* The “G” is for gumbo.

Yum. Just…yum.
Remember last week I told you about my Shrimp’n’Grits, and promised to tell you all about the gumbo I made later that evening with the shrimpy butter as the base for the roux? Well, here you go. I call this my “Kitchen Sink Gumbo” because, in direct violation of everything I read in my Louisiana cookbooks (specifically Donald Link’s Real Cajun and the Times-Picayune collection Cooking Up a Storm) it involves seafood, chicken, and andouille sausage all thrown in the pot together. And it’s goooood. I tasted it to see if it needed more salt/kick/whatever and said, “Oh, that’s good. [pause] OH. That’s goooooood.”
I’d never made a gumbo before, but there were things I knew I wanted (shrimp, chicken, andouille) and things I knew I didn’t (green peppers — I’m allergic). I ended up consulting all of the gumbo recipes in both of the aforementioned books and then making a bit of a mish-mosh of them all. I think the biggest deviation I made (aside from combining all the meat types) was the roux. All of the gumbo recipes I consulted called for an oil-based dark roux; I wanted to use my shrimpy butter so I ended up with a lighter roux. I think it came out just fine (where “just” = “damned”). I served it over rice, and found that a sweet cornbread makes a nice side.
(loosely adapted from recipes found in Donald Link’s Real Cajun and the Times-Picayune collection Cooking Up a Storm)
Ingredients:
- 3/4 c butter
- 3/4 c flour
- 1/4 c diced celery
- 1/4 c carrots, sliced into coins
- 1/4 c onions (I don’t really like onion a whole lot, and I especially hate chopping onion, so I used itty bitty pearl onions that I just cut in half and threw in.)
- 1 can Progresso red clam sauce
- 32 oz. chicken broth
- 1/2 lb shrimp, peeled and deveined
- 1/2 lb chicken, diced and cooked
- 1/2 lb andouille sausage, sliced into half circles
- 2-3 bay leaves, crushed
- Salt to taste
- Cayenne pepper to taste (1/2 tsp was just enough for me, but I’m kind of a wimp when it comes to spicy)
In the bottom of a large stockpot or dutch oven, melt butter. Add flour to make a roux, and cook until fairly dark (but be careful not to burn it). Add celery, carrots, and onions. Cook until soft. Add clam sauce, broth, and all meats. Boil for a few minutes, stirring frequently. Reduce heat, add bay leaves and simmer for 2hrs (give or take). Add salt and cayenne pepper just before removing from heat.
Va-va-voom!
May 7, 2012 § 4 Comments
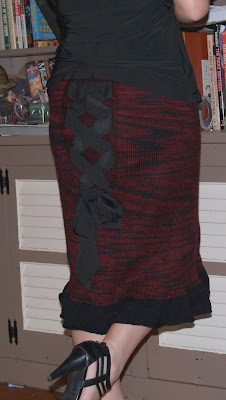
And finally, here are pictures of the finished Intolerable Cruelty:

Reading is sexy!
Kickin’ it
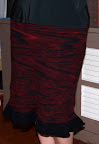
Love the way the color moves
I have worn this skirt three or four times now, and I feel like the sexiest thing on two legs every time I do. I love the way the patterning worked out, I love the wide ribbon in the back, I love the length and the way it clings to my curves…I really just adore this skirt. The only change I need to make is to tighten up the elastic a skosh, but that’s a quick and easy thing (if I ever get 5 spare minutes again).
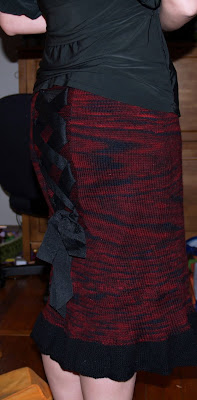
One more angle for the road
Stepping outside
May 5, 2012 § Leave a comment
There are a lot of things that I’m moderately good at, and even a few things that I’m really, really good at. But there are also things I’m horrible at. One of those things is self-promotion. It makes me really, painfully uncomfortable to talk about myself and my accomplishments. And there’s this one really awesome thing that happened that I should tell you about, because this is, after all, ostensibly where I am to feature my professional design work. So here goes:
Last year, I decided to really buckle down and get this whole “pattern design” thing going. I’m comfortable with self-publication, but since I’m not great at self-promotion, my patterns tend to just sit there. I do actually know all of the things I should be doing differently…I just have a really hard time implementing them. So I decided to take a different tack, one I’d avoided before because of the fear of rejection. Turns out my fear of rejection is not as strong as my aversion to saying nice things about myself (yes, you read that correctly: I would actually rather hear other people say not-nice things about my work than to say nice things about it myself. I gots me some Issues™.). I started reading calls for submissions on Ravelry, did some sketching and swatching, and submitted a little bolero to Knitscene.

This little bolero, in fact. Which you can find in the Summer 2012 issue of Knitscene, available on newstands and in your local yarn store now, or directly from them here. (The protoype is pictured above in a black sparkly cotton that’s just gorgeous in person. ETA: It’s 2nd Time Cotton by K1C2)

Leaf lace detail — I think my favorite thing about this sweater is the way the insets create lovely big scallops along the neckline.
Since then I’ve been sending out submissions pretty regularly, and have had a couple of others picked up (which is why there’s been a dearth of content here lately — I’ve been spending every spare moment knitting my widdle pingers to the bone), so those will be out soon-ish. And I will be sure to tell you all about them when they’re available. Because you know what? I’m really proud of them, and me, and I think you’re going to like them.
Things that make me say “y’all”
May 1, 2012 § 1 Comment

Been wondering what awesome looks like? This is it, right here.
I’m not sure if I’ve mentioned it here or not, but as a general rule I have not been fond of seafood. Fish and chips (it’s battered and fried — what’s not to like?), yes, but otherwise, not so much. As I’ve been cooking more, though, I’ve been reading recipes and descriptions of seafood that just sounds delicious. So over the past couple of years, I’ve been making an effort to try more seafood, both different types and different preparations. There was that salmon a while back, which was pretty tasty, but I don’t think I’m going to become a regular salmon eater. A few months ago, though, I discovered shrimp, in all its shrimpy goodness and glory, and now I find myself craving shrimp once or twice a week (at least).
Now, I do have very specific needs when it comes to shrimp: they must be warm, and they must be either small or cut up into bite-sized chunks. No Jumbo Shrimp for me, thankyouverymuch. But, as long as those conditions are met, I adore shrimp. I especially adore shrimp when they’re all Southern’ed up… barbecued, for instance. So I was pretty excited when Michael Ruhlman’s recipe for butter-poached shrimp served over bacon grits came across my interwebs.
Y’all. I cannot even tell you how mind-blowingly delicious this is. I did change it up just a skosh from Mr. Ruhlman’s recipe, namely by adding cheese to the grits and leaving out the onion. Also, since I added the cheese, it wasn’t necessary to add the butter from the poaching (don’t worry — it didn’t go to waste…I used it later when I needed to make a roux for my gumbo, which I will tell you all about in another post). I also adjusted the timing a little, and I halved the recipe (which ended up being about 2 servings for me). Here’s how I did it:
(adapted from Ruhlman’s Twenty: 20 Techniques 100 Recipes A Cook’s Manifesto by Michael Ruhlman, as reprinted on publicradio.org)
Ingredients:
- 1 c water
- 1/4 c old fashioned grits (NOT instant. Seriously, y’all. If you’re gonna use instant grits you might as well just stop right now.)
- 1/2 c diced bacon, cooked
- 1/4 c shredded sharp cheddar cheese
- 1/2 c butter
- 1/2 lb shrimp, peeled and deveined
In small saucepan, bring water to a boil. Add grits and stir, then cover and reduce heat to medium low. Let cook for at least 25 minutes, stirring frequently.
When the grits have about 5 minutes left, melt butter a couple of tablespoons at a time in a saucepan just large enough to hold your shrimp (I used a 3qt saucepan for the 1/2 lb), stirring constantly. When all of the butter is melted, add the shrimp and cook for about 5 minutes. Shrimp should be cooked through. Remove from heat.
While the shrimp are poaching, uncover the grits and and stir in the bacon, heating it through. Remove from heat and stir in the cheese until melted. Plate the grits, then spoon the shrimp over them.
