So Fine They’ll Never See Ya Leavin’ By the Back Door
January 17, 2014 § Leave a comment

The first time I saw this house — and in fact, all the times I saw it before we moved in — I thought the kitchen wallpaper was a rather pretty, if dull, blue and tan pinstripe. After the previous owner moved out (thus removing all the tchochkes from the walls) I was a bit horrified to discover that the wallpaper had apparently originally been blue and white pinstriped. I was full-on grossed out when I found a roll of the wallpaper, dated a mere 7 years earlier. So, painting the kitchen was the third thing we did (changing the toilet seats was the first, painting the closets was the second — I can’t abide a used toilet seat or unfresh closet) after taking possession.
That was 12 years ago, and we decided last month that it was time for a new paint job. This time, I went all out and in addition to painting the walls a sunny yellow with white trim, I painted the dark wood cabinets white. Talk about transformation! Suddenly the kitchen is this cheerful, bright space. The only problem was, the old valances were off-white. Have you ever put off white curtains next to white paint? The curtains just look dirty. So, something new on the windows.
I was browsing Pinterest, like I do, when I came across this pin showing strips of fabric tied as a valance. I love the casualness of it for the kitchen, and you can hardly beat the price if you’ve got strips of scrap fabric handy. Of course, all of my fabric is in storage, but a quick trip to the local Joann clearance section netted me several fat quarter packs in the right colors for less than $10 all told. With the yellow walls, white cabinets, and accents of red and blue, I decided to use fabrics of the same colors in various prints, with a little orange and green thrown in here and there. I absolutely adore the way they came out!
Found It on the Internet Friday #16
October 12, 2012 § Leave a comment
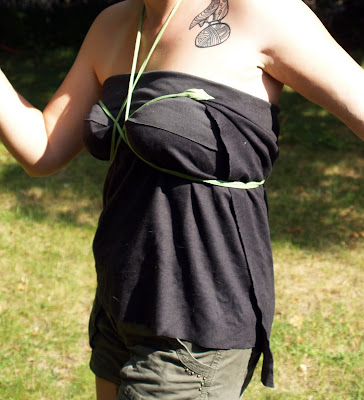
Fall has…fallen. The temperatures are dropping, and I’m chilly ALL THE TIME. So when I came across this tutorial for a super easy, lightweight cowl I was all over it. It’s exactly right for chilly-but-not-cold weather.

I’m wearing it doubled — cute, right?
It’s seriously so, so easy. Take an old tshirt (or a new one you picked up on sale or something). Cut the bottom hem off. Then cut parallel to the bottom hem just under the sleeves. You now have a tube of fabric. Stretch that mutha out as much as you can. Start with stretching it your full wingspan, then you can step on one end and pull the other up — the more you stretch it, the longer it will get (obviously) and the curlier the edges will get. I think I might make a few more of these and decorate them with bleach pen designs, or dip dye them, or applique them…
Found It on the Internet Friday #16
August 24, 2012 § Leave a comment
A while back, I found this business card holder on the Pinterest, and I determined to reverse engineer it and make one for me. And every once in a while, someone would repin it and I would be reminded of this determination, and then I would get distracted and/or busy (I got a lot of stuff going on, y’all) and forget about it again for awhile. So when I found myself preparing to go up to The Knit and Crochet Show, I decided it was time.
And I looked at it, and sighed, and procrastinated, and then realized that I had plenty of little scrappy swatches just hanging around on my desk that would make a perfectly lovely biz card holder if I would only sew them together. So I did that instead.

Why yes, you should totally assume that the cute graphic and font are foreshadowing an updated site design…
Found It on the Internet Friday #15
August 17, 2012 § Leave a comment
Oh, Pinterest. The delights you lead me to. This one was so easy…a rectangle of jersey fabric with a couple yards of t-shirt yarn sewn on to opposite corners. You can wear it as a skirt, as a wrap, as a top.
So comfy on a sweltering day.

This one is a bit longer and makes a great lightweight skirt — it can even be worn as a mini-dress.
You’ll need some jersey fabric, wide enough to wrap around your waist (or chest) about 1 1/2 times. The length of the fabric will determine the length of the skirt/top. The grey piece in the top pic is about 30″, and I flip it over at the top before I criss-cross and tie it when I wear it as a shirt. The red piece on the bottom is about 36″ and is a great longer skirt. Both pieces are 45″ wide.
Found It on the Internet Friday #14
July 7, 2012 § Leave a comment
Yeah, yeah, I know it’s Saturday. But at least it’s posted!
I don’t know if I’ve mentioned it here, but after I had my final child, I decided to get serious about losing all the extra weight I was carrying around. After a lot of experimentation, I finally found a system that worked for me, and dropped about 40lbs. I feel better, I feel like I look better, and it’s a lot easier for me to find and make clothes that I’m comfortable wearing. However, it did leave me with a big pile of giant t-shirts that I loved but no longer could wear without looking like a total slob. So I’ve been looking for good ways to make them wearable again.
Pinterest has, of course, been invaluable. The other day I came across a super easy tutorial for turning tees into tanks, and this is what I ended up with:

Cute and comfy!
I did a couple this way, and I have to say, they are super comfy. You do need to make sure that your design is low enough on the shirt that you have room for the casing, but other than that they’re pretty much no-brainers. I’ll definitely be making more.
Found It on the Internet Friday #13
May 25, 2012 § Leave a comment
Yes, Found It on the Internet Friday is back, baby! Woohoo!

This week, I made a Rapunzel wig for my daughter. A few weeks ago, she told me that they would be having “Dress as Your Favorite Character” day at school, and she really wanted to be Rapunzel but [insert tear-filled big brown eyes and a suitably pitiful expression here] her hair was too short. I’d seen Rapunzel wigs around on the interwubs, and even Pinned a couple with the intention of making one for her someday. Looked like “someday” had arrived.
I obtained yarn (3 balls of Lion Brand Baby’s First — a bulky cotton acrylic blend that’s nice and soft and just the right color yellow along with a single novelty oddball in the same color for a little texture) and studied the tutorials.
The first step was to get the yarn out of the balls and into suitably long strands. To make as per the tutorials (which I didn’t, but more on that later) you want the strands to actually be twice as long as the desired length of the hair, as one half will be on one side of the head and the other half will be on the other side. The easiest way to do this is to wrap the yarn around a tall piece of cardboard like you’re making a giant tassel (note to self: hmmmmm…giant tassel might be an interesting decorative element). I still had the display from Becky’s science fair project, which is about 3′ tall — perfect.
After winding all of the yarn off (important note: you want all of the yarn ends to be at the same end of the cardboard), I used a piece of waste yarn to tie the bundle together loosely at one end (opposite where you ended the balls) and then cut the other end open. Now it was time to sew it onto the base.
Ah, the base. So, the first tutorial I found indicated one would need a wig cap. I did not have time to obtain such a thing. Another tutorial suggested using the cutoff sleeve of an old t-shirt. This I could do. I cut the sleeve off and sewed the end shut, then tried it on Becky’s head, and it fit. Awesome! I took my bundle of “hair” and centered it on the cap, then used my machine to sew right down the middle, front to back (you could totally do this by hand but it would be tedious and I hate hand sewing with a white hot passion anyhow).
I put it on my phrenology head and braided the hair, then tried it on Becky again. No good. Couldn’t get it to stay on her head. I thought maybe I’d started the braid too far up, so I took that out and started it lower (leaving the hair at the top looser so the cap would have room to stretch). Still no good. Maybe the cap isn’t deep enough? Perhaps if we sewed it to a hat we knew fit?
So I was looking for an old winter hat of hers to tack the thing to, and came across the hat from her candycorn costume (how did I not blog this?!?! Clearly that’s going to have to happen.). Perfect! I sat down and sewed the tshirt cap onto the candycorn cap BY HAND, even. Still no good. Can’t get it to stay on her head, even with no braid. Sigh. Epiphany: I shouldn’t craft while sleep deprived, because I sewed the too-tight thing on to the big-enough thing, making the big-enough thing now too-tight. Duh.
As I sat down to rip the whole thing out so I could sew the hair directly onto the candycorn cap, it occurred to me that there was no need to actually unsew the hair…that in fact leaving it attached to a strip of the tshirt material would make it easier to sew back down. So that’s what I did (if I was doing it again and starting from this point instead of screwing up twice on the way, I’d sew it flat to a strip of material then proceed from there). Then as I was getting ready to attach it front to back again, I had another epiphany: What if, instead of front to back, I attached the hair from side to side around the front of the base of the cap? I pinned it to check if it would work and YES! Beautiful! And much easier to sew! (Except I kept not paying attention and getting strands stuck so the machine needle kept breaking and flying into my face. XTreme Crafting at its finest.)
So, I got the hair back on — above the elastic so I’d still have the stretch — and tried it on the Girl Child. It fit. It stayed on even when she walked around a little. YAAAAAYYYY! Got it braided (I did start too high the first time and had to redo it, but that was no big deal) and it still stayed on. Finally, success! My reward? This smile:

Yep. Totally worth it.
The two changes I want to make are: a) because of the way the hair falls you can see the wig cap in some spots. However, this will be a pretty easy fix — I just need to arrange the hair properly then overstitch it at the “hairline” so the strands don’t fall. Silly gravity. And b) because I needed to keep the stitching above the elastic to retain the stretch, there’s a big white band there. It passable as a “headband” but I’d like to put a ribbon over it and pretty it up a little. Both little things and easy to fix — we just didn’t have time before school this morning.
Found It on the Internet Friday #12
February 3, 2012 § Leave a comment
A quickie, because it is late and I am tired (and it’s actually Saturday and I still need to take pics so it’s going to be even later on Saturday by the time this gets posted and as it turns out that was last week and I never did take the damn picture so here it finally is yeah, I typed that before I took the picture and then never did…seriously it’s been like a month now but I really did finally take the picture). A couple of weeks before Christmas, I came across this great post on Pinterest about making snowflakes (which is awfully fun anyhow) out of junk mail. I get about a bajillion catalogs every week, especially at this time of year, so I decided to use those. The kids absolutely loved it. In fact, a couple of times Becky asked if we could cut out snowflakes instead of watching TV. (!!! Yes, yes we can.) They’re both still pretty young and not that confident in their cutting skills, but here’s what we ended up with:

There is a giant grocery bag full of these. The kids cut them faster than I could fold the pages for them. They're still asking to make snowflakes these days, too, and starting to do more recognizable shape cutouts, which is very cool to watch.
Found It on the Internet Friday #11
January 13, 2012 § Leave a comment
Look at my pretty fairy lights!
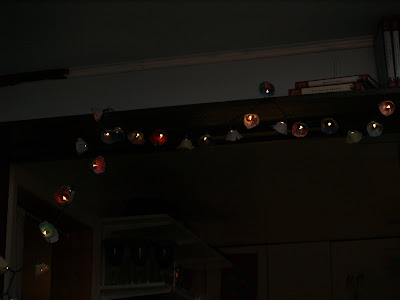
They make me so happy!
I came across this on Pinterest and decided it would be a great project to do with the kids. I was not wrong. They did all the painting, and I did the cutting and hole-poking. One tip: paint first, cut the egg cartons apart later, especially if you’re working with small children. These were super easy and now I want them all over my house.

I gave the kids free rein with the colors -- no two are alike.

Some of them are even sparkly!
Found It on the Internet Friday #10
October 28, 2011 § 1 Comment

Look, it's a long post and I don't tell you what this is until the end. But trust me, it's delicious.
I don’t like seafood, as a general rule. There are a couple of exceptions, namely fish & chips and New England clam chowder (really though, I think this applies to most food: if you deep fry it or drown it in cream sauce, what’s not to like?), but really, I just don’t like seafood. I really, really want to, though. So often I see an amazing looking picture or read a description that makes my mouth water…it seems a shame to just dismiss all that yumminess out of hand. So lately I’ve been on a quest to find ways of consuming seafood that don’t involve deep-frying or cream sauce.
When I first started this journey, a little over a year ago, I had the good fortune to be invited to a cajun dinner party, and I was determined to try a little of anything I wasn’t allergic to (bell peppers — give me contact sores. Good times.). Of course there was a lot of seafood, but much of it was in stews and so forth, so not particularly noticeable. The two things I did try that were definitely seafood-y were shrimp grilled with andouille sausage slices and a fun take on Oysters Rockefeller…since I didn’t want any spinach (cooked veggies make me nauseous…I got issues, man) my buddy Dan hooked me up with two bits of bacon, so I had a little bacon-oyster sammie. OMG. Both of these things were not just edible but melt-in-your-mouth delicious.
I’ve tried a couple of other things since then — lobster mac-n-cheese anyone? — and for the most part, have enjoyed them. I’m still a little nervous though, and I’d certainly never cooked fish. Until the other day, when I came across this recipe for Asian Marinated Salmon with Grilled Pinapple on Jolts & Jollies (via Food Buzz). Holy delicious. This one’s definitely a keeper. (See what I did there?)
The only change I made was I used bottled pineapple juice for the marinade and fresh pineapple planks for the grilled pineapple instead of canned rings, and I used an indoor stovetop grill instead of an outdoor grill because it was rainy as hell the day I made it.
Found It on the Internet Friday #9
October 21, 2011 § 1 Comment
Love, love, LOVE these skirts! The ease of a circle skirt without the bulk at the waistband/belly area (because really, who wants that?). So far I’ve made two, with two more cut out and ready to be sewn. This one is totally my favorite:

Clearly, this one make me feel fun and saucy.
I also have one that’s a little longer, made of the same solid red that’s the waistband on this one. The two to make are a purple raw silk and another print, this one with a black waistband. And I’m sure there will be more when those two are done…these are so easy to make and look great on. The one big change I made is that I didn’t bother with the buttonhole. Not because I was being innovative, but because I couldn’t find my buttonhole foot for either of my sewing machines. I’m not fond of sewing buttonholes by hand, so I tried the all-but-buttonholed skirt on and found that it looked great just twisted over (where the inside edge meets the top, bring the bottom sash end up over the top and just keep wrapping). Since that made the skirt even easier, I plan to keep doing them that way.
- Original idea found at Simple Simon & Co.
- Additional useful tutorials at Made, Ruffles and Roses, and Bored and Crafty
