Plan Z, or Fourth Time’s the Charm
April 24, 2012 § 1 Comment
Y’all, Zack’s birthday is in November. That’s how long this post has been waiting around for me to get my sh*t together and put the photos in and post it already. I feel much shame. The timing’s good, though, because Becky’s birthday is this week and she’s decided she doesn’t like cake that much, so we’re not doing a fancy cake for her birthday this year. Just brownies and Rice Krispie Treats, oh, and homemade mint chocolate chip ice cream. Recipes (such as they are) for the latter two will be shared soon. Swear.
I have established a tradition of baking awesome cakes for Becky for her birthday. Zack hasn’t ever requested anything particular, so he’s just gotten cake. This year, though, he decided he wanted a Thomas cake. No problem, I figured. I made the Millennium Freaking Falcon, after all. How hard can Thomas be? They even make cake pans in the shape of train engines! This was going to be, excuse the expression, a piece of cake.
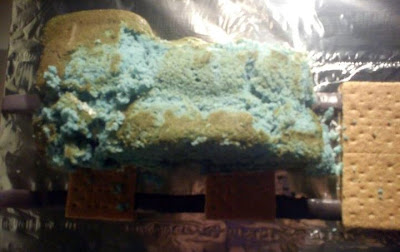
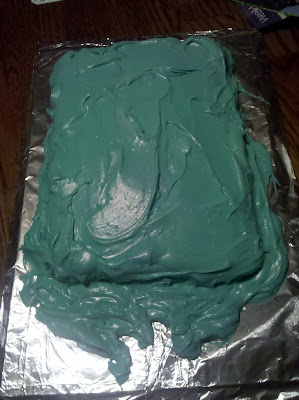
Zack’s party was Sunday afternoon. The plan was to bake the cake Friday night so it would be nice and cool for me to decorate Saturday. I considered using the yogurt cake recipe that I’ve had so much success with, but wasn’t sure if it would be structurally sound enough to hold the novelty shape. So I whipped up a box mix, added the blue food coloring (as requested by the birthday boy) and popped that sucker in the oven (after I figured out the pan — it’s two parts that snap together. Weird.). Seemed to come out okay — the tester came out clean — so I set it on the rack to cool as per the pan instructions.
After it had cooled I went to pop the pan apart and while the part under the tester hole was fine, much of the rest of it was raw batter. Failed cake #1. Saturday morning I hied myself to the store and bought another couple cake mixes. Mixed cake number two, poured batter into train pan — separated this time (with foil over the tester hole) — and back into the oven. Forgot to add food coloring — no good.

Batter, batter, no batter!
Open another box, mix/add food coloring/pour/bake. Finally, cakes bake through and are the right color. Sweet! Now, to decorate. So now I have to get the cakes together. I shave the center edges of each cake, slap on some frosting, and push them together. Success! For about four minutes. And then the structural integrity — or lack thereof — shows its ugly face and large pieces just start falling off.

I find your lack of structural integrity disturbing.
I try to stick them back on with frosting (because you can never have too much frosting, and incidentally, the frosting was homemade cream cheese frosting), but every time I get one piece stuck on, another one falls off. Eventually, I have what is basically a lump of frosting with some cake stuck on. It is clearly not going to stand up properly. Maybe I can just lay it down on the track? So it’ll be like a photo laid down flat?
Looking like the train wreck it is.
Right. Clearly, the train cake is just not going to happen. And now I’m beginning to doubt that I can make this happen at all. A Facebook friend pointed me to this alternative (love crowd sourcing!):

Cute, right?
and I was considering it, but my confidence was, frankly, a little low at that point. Also it had gotten to be about 9pm. So I decided I’d just buy a damn cake in the morning — I could just draw a Thomas on with frosting (have I mentioned that I love my frosting gun? Got it half price on clearance at Bed Bath and Beyond because the box was damaged.).
Off to the A&P and they actually had a Thomas cake!!! I was halfway to the checkout when I looked at the price and saw it was $27. Yeah, I ain’t paying 27 bucks to feed cake to a bunch of toddlers (yes, I ended up spending way more than that on cake mixes etc. You keep your logic to yourself.). I hemmed and hawed and finally decided to make the alternative cake. I grabbed yet another cake mix and some candy for the landscaping. Baked it, cut it decorated it (after spending a few minutes trying to figure out why the original didn’t feel quite right: take another look and tell me where that tunnel is coming from? Bespin?) and ended up with this:
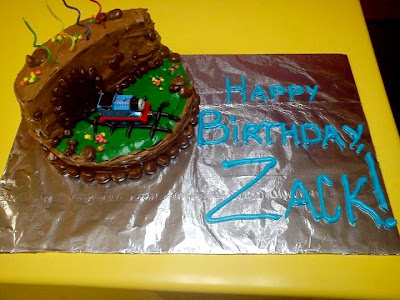
Choo choo!
Not too shabby, right? Zack was okay with it but not thrilled (I didn’t realize he’d already had a “landscape” Thomas cake at another birthday celebration or I would’ve figured out something else to do), but then it wasn’t really what he — or I, for that matter — was hoping for. Still, I’m not ashamed of it, and I got lots of compliments. The larger “stones” are Milk Duds, the smaller ones are Raisinets, and the patches of flowers are Nerds.
Baking cakes ain’t like dusting crops, boy!
February 7, 2012 § Leave a comment
I’m working on a new recipe to give you next week (I’m in the testing stage, because I overcooked it while I was writing it down the first time. Oops.) so this week’s Tasty Tuesday is a rerun.
Originally published April 25, 2010 on the A Frayed Knot Knits blog:
Somehow, my daughter Becky has become a huge Star Wars fan. I know, right, how could this possibly have happened? She has recently:
– cried when watching Darth Vader’s body burned on a pyre at the end of Jedi
– told me that I shouldn’t be watching Fanboys because “We don’t watch other Star Wars movies! Only Star Wars, Empire Strikes Back, and Return of the Jedi!”
– declared that she wants Darth Vader to be her father instead of Luke’s because “Luke is a bad boy and doesn’t deserve him.”
– announced that she wants to be Han Solo when she grows up
– requested demanded a Millennium Falcon cake for her birthday, with Han Solo, Darth Vader, Chewbacca, and Princess Leia, but not Luke, “because Luke is too whiny.” Because I’m a sucker for the Millennium Falcon, and a challenge, and my little girl, I said, “Sure! How hard can it be?” And then I found out:
The party was Saturday at 4pm. Giant props to Kit for handling every detail of the party, from scheduling the space (Build-A-Bear) to taking care of the invites to greeting the parents and filming the party, leaving me free to concentrate fully on the cake.
I had originally thought to do gum-paste figures, but the tiny little sane part of my brain said, “Hey, dummy — they make perfectly good action figures, and then the kid will have a bonus birthday present, too!” So I went out and got everything but a Leia (because the Toys’R’Us I was at didn’t have one, but she was not terribly missed, so it’s okay). I had already ordered the most awesomest birthday candle EVAH for her: Darth Vader holding as his lightsaber a red candle.
After some hemming and hawing, Becky settled on both chocolate and vanilla for the actual cake. I do not particularly enjoy actually baking cakes, which means I don’t do it often enough to get really good at it, which means I bought mixes. My mom’s in town (hi, Mom!) and she helped me get the mixes all, well, mixed and into the oven. One large (13×9) chocolate rectangle for the bottom, and two 9″ vanilla circles for the top + accessories. They came out fine, and we were ready to carve them Friday.
Now that I think about it, perhaps “ready” isn’t the right word…I wasn’t quite prepared for the reality of carving cake, and got pretty frustrated, especially with the cockpit. I finally ended up with something I thought would work, but it was clearly unstable and would need to be attached just prior to putting the fondant on, which I had planned for Saturday morning. Here’s what it looked like Friday night when I was done:

Bright and early Saturday, Kit took the kids for a walk, and I started putting it together and getting it ready for frosting. I had done the carving on a board, but wanted to transfer it to the actual presentation board before frosting. This necessitated planning the layout, so we opened up all the action figures and the candle, which promptly broke at the ankles. All attempts to repair it failed, and actually broke the base even further. Lacking the time to panic, I decided to just set it aside and deal with it later.
We decided where the ship should be on the board, and I commenced frosting it (in case you’ve never worked with fondant before, you put a thin layer of regular frosting on to “glue” the fondant). This meant it was time to attach the cockpit, which promptly disintegrated. You can see in the picture above that I had originally carved the cockpit piece out of the vanilla cake, and as it turns out, the chocolate cake holds together a little better. So I quickly re-carved it out of a piece of chocolate cake that was in my big bowl o’ cake scraps, and skewered it on. And then the bottom fell off, and I panicked.
While part of my brain was panicking, the other part was applying frosting and considering the situation. I finally came to the conclusion that the solution was to cheat. So I went upstairs and got some styrofoam and carved my third cockpit. This one didn’t fall apart, and I moved on to the actually fondanting.
There were a couple of tricky things about applying the fondant, mostly because the shape has a lot of nooks and crannys and this is only the second time I’ve ever used fondant, so I’m not particularly well-versed in manupulating it. But I got it on the cake with no real problems, and despite some cutting errors and a little bunching on the back, I thought it looked pretty good. It was, at the very least, the right shape:

Oh! Before I did the big fondanting bit, I decided it would be a good idea to practice a little and remind myself of how the fondant moves and acts. So I built the sensor dish, which ended up being my favorite part of the cake:

Now that I had the fondant on, it was time for the decorating. I cut out the dots that are a recognizable part of the top of the MF, with the plan of spray painting them with the black frosting I’d purchased for the dual purposes of painting said dots and also dirtying up the finished ship. It turns out that the “black” spray frosting is really more of a “light silver gray,” even after several applications. So it was off to Michael’s for emergency black frosting coloring…and where I found food-safe markers, including black. Win!
Back home, I set Mom to the task of coloring the dots, while I began applying the details with white piping. Then I changed my mind and decided most of the lines should be scored, with a very few details sticking up. So I scraped it down and started over, and let the sane part of my brain convince the panicky part that we had plenty of time as long as we didn’t get too carried away. Applying the blue of the engines to the back was considerably less stressful than I had thought it was going to be, and it improved the lines of the back of the cake quite a lot.
Now, Becky had specifically requested that we included the red/rust detailing — it’s on the real thing, and it’s on one of her toys but not the other — so I used the red marker to color that in, and then went back and piped in a few details here and there, using her two MF toys for reference (incidentally, I highly recommend having a 3D model on hand when doing something like this — much better than trying to find pictures with the right angles on the internet). I redid the cockpit a couple of times, and never was quite happy with it, but finally I had to declare it finished. I took it outside and gave it a quick spritzing with the “black” spray frosting, just to scunge it up a little.
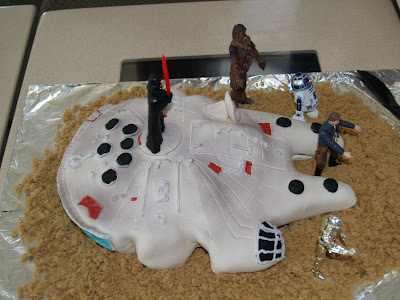
I have to say, I was pretty pleased with the end result. It’s not the best looking Millennium Falcon cake I’ve ever seen, but I think I did a pretty good job for someone who doesn’t really decorate cakes:


I was a little annoyed about only having the foil for it to sit on, but then I had an idea while I was in the shower (yes, I finished in enough time that I was able to shower and even iron my skirt before we had to leave for the party!)…on the way I grabbed a couple bags of brown sugar and when we set the cake up, I think it looked a lot like it was parked on the sands at Mos Eisley:


And look! I solved the Darth Vader problem and the gun turret problem (at some point I realized that I should have guns up there and I wasn’t sure what the hell I was going to do) in one fell swoop! Yay me!
Next time, I’m going to make someone else cut the cake — it was a lot harder than I expected it to be. It took about 5 minutes to go from the above to this, and I really felt like I needed a good lie-down afterwards:

(Incidentally, when you stack cakes on top of one another, don’t forget to put a layer of frosting in there — you’ll thank yourself when it’s time to serve.)
I have to give tremendous thanks to Kit and Grandma Tedi for all their help and encouragement and keeping the kids out of the kitchen/dining room/my way. And especially thank you to Becky, who told me at every stage how awesome her Millennium Falcon cake looked, and made me remember why I was doing this even when I was so frustrated with the cockpit that I was seriously considering sending Kit to the A&P for a plain old sheet cake. Love you all!
Cuppycakes
June 4, 2011 § Leave a comment

Might not be the prettiest cupcake I've ever seen, but it's one of the best I've ever eaten.
In case it’s not clear, I love to bake. Like really, seriously, I LOVE to bake. I have been known to bake 4-5 different kinds of cookies in a single day, in the summer, in a non-air-conditioned house. I’m pretty darn good at it, too. I make all kinds of different varieties of breads and pies and cookies and other nommy things…but I’ve never really been successful with cakes, for some reason. I have trouble with the flavor and texture and they just don’t turn out right somehow. So I’ve always relied on…shameful pause…mixes.
And really, I was okay with that. Cake is rarely eaten at my house (the incident when I ate an entire double layer cake by myself in under 36 hours notwithstanding), so on the rare occasion when I needed a cake, a mix got the job done. But now I have kids, who expect fabulous cakes. And while so far they have been satisfied with the mix cakes I’ve used as the base for those fabulous cakes, I just don’t feel right about not making their cakes from scratch. So I decided to work on my cake baking skills. On the day I decided this and started cruising the internet for cake recipes to try out, this recipe came across my Twitter feed.
Cupcakes have long been my nemesis. I can’t even make decent cupcakes out of a box. The bottoms always get burned, and they’re dry but somehow also underbaked in the center…I dunno. It’s weird. But seriously…Key Lime Cupcakes? Yeah, I had to have me some of those. So I started down the ingredients list, checking to make sure I had everything on hand. (Protip: Always make sure you have all the ingredients or adequate substitutions before you begin mixing. I cannot tell you how completely it sucks to get halfway through your batter/dough making only to discover you’re an egg short or are somehow completely out of flour.) That’s when I discovered that this recipe called for seven whole eggs. No, seriously. Let me say that again. Seven. Whole. Eggs.
I happened to have seven eggs on hand, but that just seemed ludicrous to me. I mean, seven egg whites I could see, or even seven yolks. But seven whole eggs? I thought not. So I Googled “key lime cupcake recipe” or some such thing and came up with this recipe, which was much more reasonable in the egg department. I did decide to stick with the original glaze, though I actually found it a little overpowering and I think next time I’ll try a lime cream cheese frosting. Also, I left out the food coloring.
The cupcakes, though, were to die for. They were dense, but not heavy. Velvety on the tongue. Lovely crisp flavor. No burnt bottoms. I’m actually going to try it without the lime juice at some point and see if they serve well as a plain cake base. I strongly suspect they will. It will be delicious to find out.
ETA: Almost forgot — this recipe calls for some self-rising flour, which I never have on hand. Here’s a quick and easy substitute, made with stuff I do generally keep on hand.
Cake FAIL = Dessert WIN
May 9, 2011 § Leave a comment
Remember those two castle cakes that didn’t make the final cut? Well, I just can’t bear to throw away food, especially when that food is delicious cake. So I put all the broken cake into food storage containers and considered making a trifle. Then for some reason I started thinking about cheesecake…not regular New York style cheesecake, but the cheesecake my mom used to make. Unlike the dense, thick cheesecake you get in restaurants (which I have grown to love for its own sake over the years), Mom’s cheesecake was light and airy, and actually served in pie form with a delicious Nilla wafer crust.
I got the recipe from Mom several years ago, but rarely make the cheesecake since until very recently I was the only one in the house who liked cream cheese (now I can count on Zacky to help me out). However, by the time I got to the store my mouth was watering for the cheesecake and I decided it was Going To Happen…I had just about forgotten about the leftover cake. It wasn’t until I had my cream cheese in hand and was heading for the strawberries (Mom served it with cherry pie filling on top, but I prefer fresh strawberries if I can get them) that inspiration struck: what if I used the light, airy cheesecake filling in place of whipped cream and used the strawberries and leftover cake to make strawberry shortcake? Genius!
The whipped cream element of strawberry shortcake has always, in my opinion, been the weak link in the dessert. Unless you have something incredibly delicate as a base, like angel cake (which I do love), the whipped cream just gets totally overpowered. This slightly denser, cream cheese-y topping was absolutely perfect, especially with the heavier cake base I was using. The recipe is below, along with information on how I treated the strawberries (it being not quite truly strawberry season yet) and also the crust recipe, in case you don’t have extra cake lying around and just want to make the cheesecake.
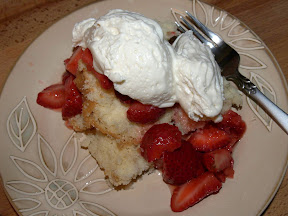
Excuse me while I devour this, won't you?
Recipe
Strawberries
- 2 qts fresh strawberries
- 0-1/3 c sugar
Remove tops of strawberries and cut into bite-size pieces. Add sugar to taste. If it’s mid-summer, you probably won’t need any. If it’s mid-winter, you may need as much as 1/3c. Using a potato masher, very slightly mash berries. You want to just mush them a little and get a little juice going, not make jam. Cover loosely (to keep bugs, domestic animals, and small children out) and leave on counter for 1-4 hours, until you see things getting saucy. NOTE: You can skip this bit if you want to serve right away, you just won’t have as much juice. Cover tightly and refrigerate until ready to serve.
Cheesecake Topping/Filling
- 1 pkg Dream Whip
- 1/2 c skim milk
- 1 1/2 tsp vanilla
- 8 oz cream cheese at room temp (low fat is okay, fat free is not — it gets lumpy)
- 1 c powdered sugar
Using electric mixer, beat together Dream Whip and milk according to package instructions (NOTE: don’t worry about the vanilla mentioned on the package, you’ll be adding it in the next step). Add softened cream cheese and vanilla and mix until smooth. Slowly add powdered sugar; continue mixing until completely blended. Refrigerate until ready to serve OR add to cooled pie crust (below) and refrigerate at least one hour to set.
Crumb Pie Crust
- 1 1/3 c vanilla wafers
- 1/4 c butter or margarine, melted (NOTE: the original recipe calls for margarine; I always use butter and it turns out fine)
- 1/4 c sugar
Preheat oven to 350°. Process wafers in food processor until they are fine crumbs. Combine crumbs with melted butter and sugar; mix well. Press evenly into 9″ pie plate. Bake at 350° 8-10 minutes, until edges just begin to brown.
Let them eat cake
May 2, 2011 § 4 Comments
Some of my fondest childhood memories are of the birthday cakes my mother baked for me. A few that stand out are the “doll” cake (if you’re unfamiliar, the cake is mounded and has a hole in the center where the doll goes — it comes about up to the doll’s waist — and the cake and the doll’s upper half are frosted to look like a ballgown), the bunny cake (shaped pan, and a bajillion little frosting dots to decorate it), and when I was a little older, a delicious poppy-seed cake. Whatever I asked for, Mom made, and I always loved it. I’ve continued this tradition with my kids, especially Becky (mostly because Zack hasn’t had a party yet that wasn’t just family).
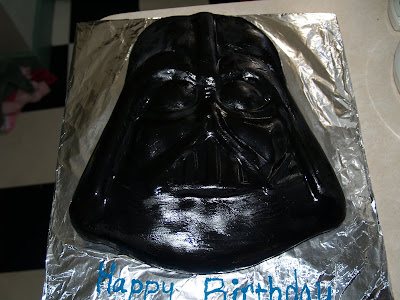
The Force is strong in this one
First there was the Darth Vader cake, which was also my first experience with fondant (I cheated and used the DV cake pan to mold the fondant. I also bought enough to make two cakes so I could practice, which turned out to be a Very Smart Idea.). To be fair, that was really the cake Mommy wanted to make — Becky only cared that the cake was blue, which — thanks to the miracle of food coloring — it was.
"She may not look like much..."
Last year, though, she requested a Millennium Falcon cake. This was considerably more challenging as I had to actually sculpt the cake. I got it done, though, and am still pretty proud of the job I did on that one.
This year, she wanted an Ariel cake. In case you don’t have a small girl-child, Ariel is the name Disney execs gave to the Little Mermaid when they bastardized the classic Hans Christian Andersen tale (the irony of my daughter loving the movie that completely ruined my favorite childhood fairytale is not lost on me). I am always up for a challenge, but I also know my limitations, and “cake shaped like a mermaid” is definitely outside my artistic range. So I suggested that perhaps we do something similar to last year’s Millennium Falcon cake and instead of Ariel herself, the cake could be a castle and then we’d just have the action figures, which would later be hers to play with. She readily agreed (Mommy is no dummy — I knew I’d get her with the toys), but asked that the cake be pink. Not a problem.

One of the castle cakes, pre-frosting
See, I knew that Williams-Sonoma had a cake pan that’s actually shaped like a castle, and I figured I’d just pull the same trick I did with the Darth Vader cake pan. This was going to be easy. Except it never is. First, it turned out that the castle cake pan is smallish. This one was easily solved…I’d just make a 13×9 sheet cake base. Not a problem. I decided to frost the sheet cake to look like the ocean and then decorate with aquarium plants to really give it that “under the sea” vibe. Once Becky found out there would be two cakes, she requested that the base be strawberry and the castle be vanilla. Also not a problem. I baked both cakes (from a mix — I’m still working on perfecting my cake baking skills) Thursday night so they’d be nice and cool for me to decorate Friday night and ready to go Saturday (her party was at one, but I wanted plenty of cushion built into the schedule).
The frosted base cake.
Friday night rolled around and I got the frosting made (cream cheese, because the birthday girl digs it) and the base cake frosted (after repairing the giant hole in the middle where it stuck to the pan). The rest of the evening went a bit like this: Roll out the hot pink fondant and try to put it into cake pan. No good — couldn’t get it down into the pan without tearing it. Reroll and drape over cake, then put pan over cake. Still no good — the details on the cake pan were just too fine and delicate to show without there being plenty of pressure to make an impression. Press cake down into pan in attempt to get impressions. Cake and fondant both ruined. Curse loudly and colorfully and send Daddy to the store for more cake mix and cream cheese (because clearly fondant ain’t going to cut it, and now aren’t I glad that I bought that cake decorator gun on clearance last month?). Mix new cake, pour into pan and put into oven, sit down on couch to relax. Realize ten minutes in that I forgot to grease and flour the “nonstick” pan and cross fingers that it really is “nonstick” but it’s already almost midnight so I won’t find out until morning.
Morning comes and I attempt to remove the cake from the pan. I’m not really sure what they mean by “non-stick” but it’s definitely not related to whether the contents of the pan will stick to the pan, because they will, quite tenaciously. More cursing, and also being glad that Daddy got two cake mixes when he went to the store the previous evening. Third cake mixed, pan prepped (I can be taught), into the oven. From the oven immediately into the fridge, where it has plenty of time to cool while I whip up another batch of frosting. Most of the frosting gets tinted pink, with a little set aside for brown (the door), light blue (windows), and lavender (trim). Cake is cooled, pops right out of pan and I plunk it down on the frosted base.

Look! A pink castle! (Pre-accessorization, obviously.)
Now is the moment of truth. See, I really don’t have a lot of any experience frosting things in a decorative manner, but I really, really want to preserve as much of the stone detailing as possible on the castle — that’s what makes it so neat. So I try a few shots on a plate for practice and it looks pretty good. Time for the real thing…and it worked! It came out really great. I will say that cream cheese frosting is not the best choice for elaborate frosting stuff like this — it’s a little too soft, which is why the castle looks a little melty. But really, I love how it came out. It got lots of oohs and aahs, and two of the moms at the party asked where I bought it!!! Most importantly, Becky absolutely loved it.

And here it is again, fully accessorized.

One awesome cake, one happy birthday girl.
Zack has already requested a train for his birthday in November. Should be fun!
