Pie-thagorean Theorems
July 3, 2012 § Leave a comment
I do actually have a couple of recipes to post for Tasty Tuesdays, but there have been some photography issues (namely, that I keep neglecting to take the photographs). So I thought today we could talk about pie crust. Because I don’t know if you’ve noticed, but I loves me some pie (and also other things made with pie crust). There are all different sorts of crusts, from cookie crumb crusts to pate brisee, but the basic crust I nearly always use is a simple all-butter crust (“all-butter” refers to the type of fat — there’s still flour and liquid involved). I nearly always use it because it’s easy, I almost always have the ingredients on hand, and it’s super easy to customize. For instance, when I make pecan pie, I put a little cinnamon and nutmeg into the crust. When I make savory pies, I often put a little garlic powder in. When I made the peach galette, I put a little brown sugar in the crust. But the basic crust is this (it’s basically the same as the one for the galette, only without the sugar and doubled, because you can always freeze the extra crust if you only need a single):
Ingredients:
- 1 c. butter, cold and cubed
- 3 c. flour
- 7-8 tablespoons ice water or chilled liquor
Crust:
In a food processor, pulse together the flour and butter until the mixture resembles coarse meal. Add in sugar and pulse once more. Begin adding water/liquor 1 Tbsp at a time until 5 Tbsp have been added, pulsing as you go. Now add the water/liquor about 1 tsp at a time, stopping when the mixture just comes together. Turn out onto plastic wrap and form into a disc. Chill to firm, about 15 minutes.
There are two super important things here:
- Don’t overprocess.
- The butter and the liquid need to be COLD.
The second thing is easy…just pop everything in the freezer. How long you need to leave it in there depends on the day and what you’re starting with. You don’t want things actually frozen, but you want them as close as possible. Not overprocessing, though, is an art. You do need to get everything combined, but you need to stop immediately after. And often — especially before you start adding the liquid — it’s hard to tell if you’ve done that. Once you start adding the liquid, what you’re looking for is this:
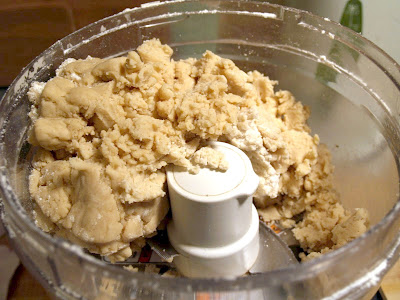
This is even maybe a wee bit overprocessed.
You want it to just barely be holding together. When you dump it and form it into a disc, you’re going to smush it together a little but again, remember that you want to work it as little as possible so be gentle. Toss it in the fridge for about 30 minutes. If you need to leave it in longer, that’s fine, but you may need to let it warm up just a bit in order to be able to work it in that case.
My very favorite new tip is one I shared with you on the galette post: parchment paper!
Put the disc between two sheets of lightly floured parchment paper and roll to your heart’s content.

No muss, no fuss!
Once you’ve got it rolled out, peel off the top layer of parchment paper and fold the crust (just the crust, not the remaining paper) into quarters. Plop it into your pie plate, unfold, and trim. Note that if you are doing a double crust, you’re better off waiting to trim until you’ve got the second crust on (and in that case, I like to just fold it up like a galette around the edges, because pie crust = NOM).
A word on using liquor instead of water in your crust. I have seen this tip all over the place and frankly, I’m not really fan. I do like to use dark rum in crust for a pecan pie because it gives it a nice flavor, but I find that my crusts made with vodka aren’t as tender as those made with plain water and also, they taste a little off. Not bad, just not quite as delicious. So I generally stick with water.
Another thing I see quite a lot of is a recommendation to make a foil shield so your crust doesn’t over brown. I’ve never had an issue with this, but then again I don’t do a lot of parbaking my crusts — I usually just pop the fillings into the raw crust and go.
Going Backwards
October 13, 2011 § Leave a comment
No, wait, that’s not what I meant. So back in the day (and even now lots of times) cardigan patterns are written such that you only have instructions for one front and are told to make the second one the same way, just reversing the shaping. But what the hell does that mean? I explain it all over on the Lion Brand blog.
Sometimes the Interwebs Just Infuriate Me
September 21, 2011 § 3 Comments
And since I have this lovely blog, I’m going to respond to the thing that most recently infuriated me. (At the end, you will be rewarded with a small Crafty Thing — feel free to skip my rant and scroll down.) Yesterday I came across this post. At first glance, it makes some really interesting points about allowing your kid to be herself, but I think it also encourages parents to make some pretty questionable choices. So here are my responses:
I force my child to say thank you or sorry [or please or you’re welcome] when appropriate, because he is three years old and often doesn’t know that he should. Part of my job as a parent is to teach him about common courtesy and interacting with his peers, elders, authority figures, and so on. He is always afforded the opportunity to do the courteous thing before I prompt him, and if I have to prompt him, we often discuss why the courtesy is necessary. In the case of “please” and “thank you”, it’s just a nicety. But it’s a nicety we practice in our home and expect our children to practice in the outside world. Such niceties let the people they’re interacting with know that they are not complete dillweeds. In the case of “I’m sorry” sometimes it’s a little different…children don’t intuitively know that they should be sorry about certain things, like doing something mean, or teasing, or accidentally hurting someone. They also don’t know that an expression of remorse to the injured party is the right thing to do when you’ve done one of the aforementioned things.
While I would never force my child to eat two more bites of dinner, I do encourage her to eat plentifully of the nutritious food she is offered, and let her know that treats of the food variety will not be forthcoming unless she first fills her belly with an adequate amount of the good stuff. If she’s hungry enough for a cookie or a popsicle, she’s hungry enough for two more bites of chicken.
I “force” my children to clean up, because it is their responsibility to clean up the messes they have made. I also shower them with praise if they clean up before I have a chance to ask/tell them to. (Incidentally, we start with asking and then move to telling, which I guess is “forcing”, if necessary. It’s usually not.) See above re: my job as a parent. Kids aren’t born knowing these things, and it’s really easy to say, “oh, well you show them” but for the first couple of years of their lives what you show them is you cleaning up after them, because they can’t clean up after themselves.
I force my children to dress appropriately for the weather (to wear a jacket), because they are not born knowing what is appropriate for an 80-degree day v. a 30-degree day. Now, there are some caveats here: I’m talking about things that would be potentially dangerous, and/or cost me valuable time in the morning while we’re all trying to get out the door. So no, my daughter may not go to school clad only in a thin dress and a light sweatshirt when it’s 25 degrees outside, because she will step outside and immediately want to change her clothes and we have to get to work/school. She’s not a dummy, she just doesn’t know yet. Nor may she wear sandals when there is ice on the ground, because that’s dangerous. However, she is welcome to present me with arguments for either of those things or, (more reasonably and something that has actually happened) ask if, say, she can wear a t-shirt under her sweatshirt when it’s cold out instead of a long-sleeved shirt, because it gets warm in her classroom. Not only am I teaching her what is weather-appropriate, I am also teaching her that a well-reasoned argument should be presented if she has an alternate to whatever I am proposing she do.
I “force” (ask, actually) my children to stop crying once they have expressed their fear/sorrow/dreams/anger and we have dealt with the issue, or if they start crying before anything has even happened, usually when they think we’re going to say no to something. We don’t listen to the request until they can stop crying to ask, and then of course if we say no and they are upset, they are allowed to cry about that a little bit (though will be asked to move to another room if they drag it out. Cry as long as you want, but this is silly, I’m not changing my mind, and you’re not looking for comfort, just trying to bully me into saying yes). Being comfortable with expressing your emotions is important, but so is learning when it’s appropriate, what you’re actually expressing, why you’re expressing it, and so on. It’s hard to stop crying once you get started, even if you no longer have a reason to be crying. Learning to control yourself and your reactions is an important part of learning to interact with the world.
The last one I actually agree with, as written: “If a child is told she is not good enough, then she is robbed of a chance to be happy with herself the way she is.” However, I think it’s important that we do tell our children when their efforts aren’t good enough, and why. Example: I have told my son to pick up his books, which are strewn about the room. He tells me he has done so, and I go to his room to check, but see that there are still a few books on the floor. The answer is not, “Oh, you did a good job!” …the answer is, “You made a great start, but need to finish up.” And if his response is to whine about it, I have no qualms about saying that what he did wasn’t good enough. It was a good start but he needs to finish it up for it to be good enough. The lesson here is that they need to put their best effort into everything, not half-ass their way through life.
Okay, done ranting now, and yes, I feel better. Here’s your crafty treat:
Pill Bottle Flower
The other day, my friend at work Pamela brought me an adorable crocheted flower that she’d whipped up for me. It sat on my desk for a couple of days and I had planned to make a pin out of it, but then I needed to call in a refill on one of my prescriptions. I didn’t get around to putting the empty bottle back in my purse and had a Eureka! moment when I saw them next to each other: the flower was the perfect size to sit on top of the bottle!

Wrapped! Super easy -- just trap the beginning end under the wraps, then when you're done, cut so you have about a 3" tail and use a crochet hook to pull it down under the wraps. Trim the end and you're done!
I grabbed some green yarn and wrapped the base up to the threads and cap of the bottle (note: I have not had a chance to glue the yarn on the cap — if you want to use it as a container, you will need to do that).

Mostly, you just want this to be secure enough so the flower doesn't pop off or wiggle around a lot.
I secured the flower to the cap by poking a hole with scissors and pulling the ends through, then tying them off with some scrap yarn. Cute right? It makes me smile every time I look at it.

I am completely incapable of taking an in-focus pic of this thing. This is as good as it got. Trust me, it's adorable.
The Yarn used to wrap is Wool Ease Thick & Quick in Grass and the yarn used for the flower is the new Martha Stewart Crafts Roving Wool in Cherry Blossom. I think she improvised the pattern, but there are TONS of free knit and crochet flowers on Ravelry. Make one that makes you happy!
I’m Not Anti-Frog, I’m Pro-Toad
September 6, 2011 § Leave a comment
(This post actually has nothing to do with toads. Sorry if I got you all excited there.) You know how sometimes you’re just cruising along with your knitting and then all of a sudden fifteen rows later you realize there’s a purl where there should be a knit and it’s really obvious and so you sit and cry a little because you’ve just wasted fifteen rows worth of knitting and have to rip it all out? Well, dry those tears, Sunshine, and head on over to the Lion Brand blog, where this week I tell you how to fix that sort of thing without the trauma of frogging.
Oops, I did it again!
August 29, 2011 § Leave a comment
Remember how I ran out of yarn for the Nurgake and had to use a second yarn to finish it off? Yeah, well, I did it again accidentally-on-purpose so I could blog about it for Lion Brand. And got a really cute little jacket out of it, too!

The cheesecake shot I decided not to use on the work blog.
This is Not a Clever Title
August 22, 2011 § Leave a comment
I’m already starting to run out of clever titles for these. More blogging over on the Lion Brand Site, this time about how to increase in pattern and keep it lookin’ purty.
More Pattern Reading Tips From Yours Truly
August 16, 2011 § Leave a comment
If you get confused by stitch groupings and repeats, today’s post over on the Lion Brand Blog is just for you. Don’t say I never gave you anything. Or if you do say it, feel a little twinge of guilt for the filthy lie you just told.
Enjoy Last Week’s Chart-onay?
August 9, 2011 § Leave a comment
Here, have another glass! Over at the Lion Brand blog again, some tips and tricks for working with charts (since I know you’ve spent the last week learning to read them).
Crisp, Refreshing Chart-onay
August 2, 2011 § Leave a comment
When I first started working cables and lace, I hated charts. Hated ’em. Then I learned how to read them, and discovered that they made everything so much easier, for several reasons. And the truth is, it wasn’t that hard to learn, either. I wrote all about why and how you should learn, too, over at the Lion Brand blog.
Size Matters
July 26, 2011 § Leave a comment
Ever wonder why some sweaters consider a 42″ bust measurement a small and others call a 40″ bust a large? Over on the Lion Brand Blog I talk about what sizes really mean and how to choose the right one for the sweater you want to make.
