Bakin’ with Bacon
June 29, 2011 § 1 Comment
A couple months ago I was kicking around the interwebs and came across this post featuring bacon wrapped in cinnamon rolls.

Droooool...
I drooled, and decided I needed to make me some of those. However, I’m really trying to get away from things like premade dough, cake mixes, etc. Mostly just because I’ve found that the more non-chemical-laden things I eat, the worse the chemical-laden things taste to me. And really, cinnamon rolls are not that hard to make from scratch, especially if you have a bread machine.

Before the feeding frenzy...see how easy the foil makes it?
So I dug around in my recipe books and found a super simple recipe in my Best of Baking tome. The general consensus was that stuffing cinnamon rolls with bacon was genius, but the rolls themselves were a bit blah. So I fiddled with the dough a bit and used a trick that I use when I make monkey bread: add some spice to the dough itself. Sure enough, that’s all it needed to kick this up from yummy to I-wanna-eat-the-whole-plate.
Recipe
The easy way requires a package of bacon (pref. maple if you can get it) and a can of your favorite cinnamon rolls. Cook bacon, lay out dough, put slices on dough, roll and bake according to manufacturer’s instructions. Note: the original post I saw indicated that the bacon was added uncooked to the rolls and then baked. I think that’s probably fine for the quick’n’dirty way, but with the long way, below, there’s a long rise time and I wasn’t comfortable leaving the bacon at room temp for that long. I am not a fan of overcooked bacon and find that the cooked bacon in the rolls below stays nice and chewy.
The real homemade way starts out and ends up the same, but you gotta make the cinnamon rolls yourself. I think it’s worth the effort. (Recipe adapted from Betty Crocker’s Best of Baking)
Ingredients:
Bread:
- 2 1/2c. flour
- 1/4c. sugar
- 3/4c. + 2Tbsp. water
- 1tsp. salt
- 1tsp. bread yeast
- 1tsp. cinnamon
- 1/2tsp. pumpkin pie spice
Filling:
- 1lb. bacon (maple if you can get it)
- 1/3c. sugar
- 2tsp. cinnamon
- 2 Tbsp. butter, softened
Glaze:
- 1c. confectioner’s sugar
- 1 to 2Tbsp. milk
Place all ingredients for bread into bread machine, in the order recommended by manufacturer and run dough cycle.
Grease 9x9x2 pan lined with aluminum foil. Cook bacon until just done — don’t get it crispy or it won’t roll up! Combine sugar and cinnamon for filling. Flatten dough into 9″ square on lightly floured surface. Spread butter on top surface of dough. Sprinkle cinnamon/sugar combo. Lay bacon in strips across dough (in one direction only, no overlapping). Roll up tightly and pinch the edge into the roll to seal it. Cut into 1″ slices. Place in prepared pan. Cover and let rise until doubled, app. 1 to 1 1/4 hours.
Preheat oven to 375F. Bake 25-30 min., until golden brown. Let cool for about 10 minutes in pan, then lift out using aluminum foil. Combine powdered sugar with milk gradually until desired consistency is reached, then pour over warm rolls.
Submitting to Yeastspotting
Foodgasm
May 19, 2011 § Leave a comment
The past weekend’s kitchen marathon (more on that later, as there is cupcakey goodness that requires sharing, plus some other nifty stuff) pretty much ran me dry of some staples like powdered sugar, eggs, powdered buttermilk, cream cheese, cupcake wrappers…you get the picture: I needed a trip to the market. While I was at said market, it occurred to me that I had snap beans and fingerling potatoes from the farm market that I needed to use up, but nothing for an entree.
I ran through a list of my default entrees, and then a list of entrees I’d been considering but hadn’t tried yet and nothing seemed quite right. So I decided I’d just peruse the meat section of the store and see if anything struck me. I considered steak, and stew beef, and chicken, and pork chops…and then I saw the lamb. I love lamb. I almost never get to have it because I’m what my mother calls “frugal” and everyone else calls “cheap” so I’m only really willing to pay the premiums restaurants charge — on the rare occasions when they have it — if it’s something special like my birthday. And somehow, I had never cooked lamb myself. But…it was the perfect amount: about 1.5lbs, cut from the leg. And it was only $4.99/lb. Into my basket it went.

Ragout of Lamb. Also on the plate, fresh snap beans and fingerling potatoes and freshly baked bread.
Of course, I realized as soon as I got home that I had absolutely no idea how to prepare lamb. I grabbed a bunch of cookbooks and settled in. I immediately discarded everything that called for an overnight marinade…I wanted my lamb tonight! I considered kebabs for awhile, but I didn’t really have anything on hand to kebab them with. I finally settled on a recipe for Ragout of Lamb from the 1961 New York Times Cookbook. The ingredient list was simple, as was the procedure for cooking. Exactly what I wanted.
If you’re not sure what a ragout is, go read about it here — I’ll wait. (I had to look it up myself, just for the record.) I did have to tweak the ingredients a bit — for instance, I didn’t have Spanish Sherry on hand, so I just threw in some of the Zinfandel I was planning on drinking with the meal. I also substituted paprika for the black pepper called for in the original: I don’t care for pepper, and I like paprika. I do this a lot…I just can’t be bothered to get a bunch of specialty ingredients, and the stuff I have on hand tends to be stuff I like. If it’s close to what’s called for, it almost always tweaks the recipe in a direction I like.
Below is the recipe for the ragout. I prepared the snap beans like this; boiled the potatoes for about 20 minutes, sliced them up and added them to the beans; and the bread recipe is the same one I’ve mentioned previously.
Recipe
(adapted from 1961 New York Times Cookbook)
- 1 1/2 lbs lamb (I used a filet from a leg), in 1″ cubes
- 1/4 c. flour
- 1/2 tsp salt
- 1/2 Tbsp paprika
- 1/4 c. olive oil
- About 1 1/2 c. chicken broth (beef broth should also work)
- 1/3 c. sweet red wine (I used Zinfandel because that’s what I was drinking)
- 2 cloves garlic, crushed
- 1/2 c. grated Parmesan cheese
- Basil to taste
Preheat oven to 350°. Heat oil in a saute pan. Combine the flour, salt, and paprika in a dish suitable for dredging, then dredge cubed lamb. (Protip: I put it all in one of those white plastic takeout containers then just put the lid on and shook it all up instead of trying to dip each of the cubes in the flour dredge. Use a fork to flip the cubes out of the dredge and into the oil.) Cook lamb in preheated oil until brown on all sides. Add broth, wine, and garlic. Simmer for 2 minutes (give or take — you just want everything to heat through). If your saute pan is oven safe and has a lid, put the lid on and pop it in the oven for about an hour. If not, transfer it to an oven-safe casserole, cover, and pop it into the oven for about an hour.
Remove from oven and uncover. Immediately stir in cheese. If sauce is too thick, stir in a little more broth; if too thin, stir in a little more flour. Spoon onto plate. Garnish with basil.
Apologies for the poor picture quality: the battery in my DSLR was dead and I was hungry, so I just snapped a quick shot with my Droid.
Cake FAIL = Dessert WIN
May 9, 2011 § Leave a comment
Remember those two castle cakes that didn’t make the final cut? Well, I just can’t bear to throw away food, especially when that food is delicious cake. So I put all the broken cake into food storage containers and considered making a trifle. Then for some reason I started thinking about cheesecake…not regular New York style cheesecake, but the cheesecake my mom used to make. Unlike the dense, thick cheesecake you get in restaurants (which I have grown to love for its own sake over the years), Mom’s cheesecake was light and airy, and actually served in pie form with a delicious Nilla wafer crust.
I got the recipe from Mom several years ago, but rarely make the cheesecake since until very recently I was the only one in the house who liked cream cheese (now I can count on Zacky to help me out). However, by the time I got to the store my mouth was watering for the cheesecake and I decided it was Going To Happen…I had just about forgotten about the leftover cake. It wasn’t until I had my cream cheese in hand and was heading for the strawberries (Mom served it with cherry pie filling on top, but I prefer fresh strawberries if I can get them) that inspiration struck: what if I used the light, airy cheesecake filling in place of whipped cream and used the strawberries and leftover cake to make strawberry shortcake? Genius!
The whipped cream element of strawberry shortcake has always, in my opinion, been the weak link in the dessert. Unless you have something incredibly delicate as a base, like angel cake (which I do love), the whipped cream just gets totally overpowered. This slightly denser, cream cheese-y topping was absolutely perfect, especially with the heavier cake base I was using. The recipe is below, along with information on how I treated the strawberries (it being not quite truly strawberry season yet) and also the crust recipe, in case you don’t have extra cake lying around and just want to make the cheesecake.
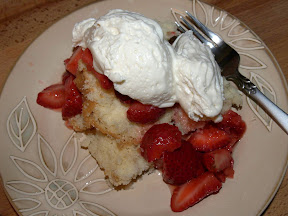
Excuse me while I devour this, won't you?
Recipe
Strawberries
- 2 qts fresh strawberries
- 0-1/3 c sugar
Remove tops of strawberries and cut into bite-size pieces. Add sugar to taste. If it’s mid-summer, you probably won’t need any. If it’s mid-winter, you may need as much as 1/3c. Using a potato masher, very slightly mash berries. You want to just mush them a little and get a little juice going, not make jam. Cover loosely (to keep bugs, domestic animals, and small children out) and leave on counter for 1-4 hours, until you see things getting saucy. NOTE: You can skip this bit if you want to serve right away, you just won’t have as much juice. Cover tightly and refrigerate until ready to serve.
Cheesecake Topping/Filling
- 1 pkg Dream Whip
- 1/2 c skim milk
- 1 1/2 tsp vanilla
- 8 oz cream cheese at room temp (low fat is okay, fat free is not — it gets lumpy)
- 1 c powdered sugar
Using electric mixer, beat together Dream Whip and milk according to package instructions (NOTE: don’t worry about the vanilla mentioned on the package, you’ll be adding it in the next step). Add softened cream cheese and vanilla and mix until smooth. Slowly add powdered sugar; continue mixing until completely blended. Refrigerate until ready to serve OR add to cooled pie crust (below) and refrigerate at least one hour to set.
Crumb Pie Crust
- 1 1/3 c vanilla wafers
- 1/4 c butter or margarine, melted (NOTE: the original recipe calls for margarine; I always use butter and it turns out fine)
- 1/4 c sugar
Preheat oven to 350°. Process wafers in food processor until they are fine crumbs. Combine crumbs with melted butter and sugar; mix well. Press evenly into 9″ pie plate. Bake at 350° 8-10 minutes, until edges just begin to brown.
